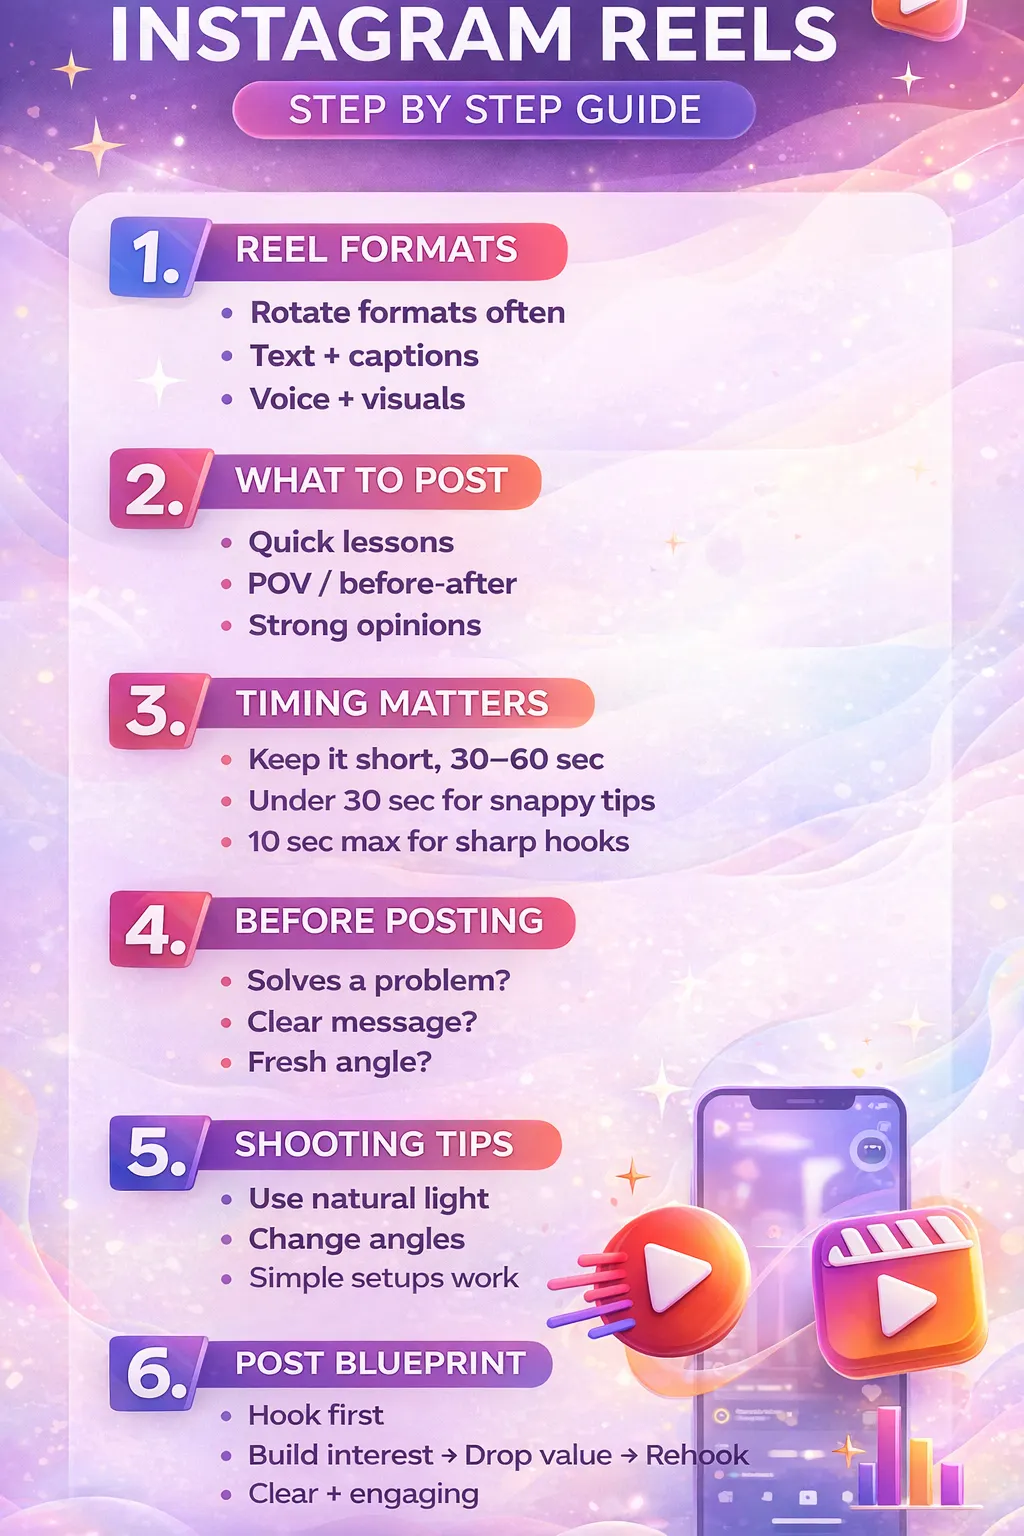
A smiling woman using her smartphone at a desk, surrounded by glowing, floating icons of Instagram Reels and Story thumbnails.
Instagram Content Strategy

How to Share a Reel to Instagram Stories (Complete Guide)

Sakthivel • April 21, 2026 • 10 min read

TL;DR

If you are wondering exactly how to share a Reel to Instagram Stories in 2026, you are sitting in the right place. This page clearly defines the step-by-step process of taking any Instagram Reel—whether it's your own hard work or another creator’s viral hit—and reposting it directly to your 24-hour Story feed to instantly multiply your views, bypass algorithmic feed drops, and generate actual leads. By combining clever aesthetic design hacks (like the hidden background trick) with smart DM automation strategies, you can turn a simple story share from a passive broadcast into a massive driver of profile traffic and direct sales. Read on for the absolute ultimate 2026 guide to mastering reel-to-story cross-promotion, packed with tips you won't find anywhere else.

Introduction

Let's take a moment to be completely honest. Reels are the undisputed king of Instagram growth right now. You dedicate hours to scripting, shooting, editing, and selecting the ideal trending audio. However, if you solely rely on posting them to your main feed and hoping for algorithmic favour, you're missing out on significant views and revenue. Sharing a Reel to your Instagram Story isn't just an afterthought anymore; it is one of the easiest, most effective, and frankly necessary ways to double your visibility, re-engage your current followers, and drive traffic straight back to your main profile.

Think about your own scrolling habits. When you open the app, do you go to the feed or tap the glowing circles at the top? In 2026, navigating the fiercely competitive and constantly shifting Instagram landscape requires more than just relying on organic feed reach. It requires a multi-layered approach. Cross-promoting on Stories is essential for any serious digital strategy, whether you want to highlight your latest educational content, showcase a behind-the-scenes moment, or share a viral video from a niche creator that your audience would love.

In this massive, deep-dive guide, we aren't just going to cover the basics. We will walk through the exact, literal steps to share Reels without making them look clunky. We’re going to look at creative design hacks to make them fit your specific brand aesthetic seamlessly. And finally, we’ll dive into advanced, game-changing automation strategies to monetise those story views entirely on autopilot. Grab a coffee, open your Instagram app, and let’s get into it.

1. Why Sharing Reels to Stories is a Non-Negotiable for Growth

Relying purely on organic grid reach isn't enough. The 2026 Instagram algorithm categorizes users based on how they consume content, meaning you must cross-promote to reach your entire audience.

Bridging the Content Gap

Some followers spend hours scrolling the Reels tab, while others exclusively tap through Stories and rarely scroll their feed. By sharing your Reels to Stories, you directly serve your content to this highly engaged segment.

Multiplying Initial Velocity

When you publish a Reel, the algorithm tests it with a small batch of your audience. By sharing that Reel to your Story, you drive instant traffic to the post. This provides the immediate engagement boost needed to signal high quality and increases your chances of hitting the Explore page.

Building Audience Loyalty

Stories are raw and conversational. Placing a highly produced Reel within a Story allows you to add context, share behind-the-scenes thoughts, and humanise your brand, building deeper loyalty between major feed posts.

You can boost your Instagram engagement and visibility by using Meta-compliant tools like InstantDM to automate "comment-to-DM" workflows while strategically resharing Reels to your Stories to bypass feed congestion and capture more of your audience's attention.

A young woman with blonde hair gestures enthusiastically while being filmed by a man using a smartphone on a tripod. The room is set up as a professional studio with two large ring lights, and a laptop in the foreground shows a video editing interface.

2. Step-by-Step: Sharing Your Own Reel to Your Story

Let’s get down to the absolute basics. Sharing your own Reel to your Story is a straightforward process, but executing it correctly ensures maximum visibility. If you mess up the formatting here, people will swipe right past it.

Step 1: Locate Your Masterpiece

First, open the Instagram app and navigate to your profile grid. Tap the Reels icon (the little clapperboard symbol right above your photos) to view all your published videos. Select the specific Reel you want to promote today. Don't just pick one at random; pick one that has a strong hook or solves a specific problem.

Step 2: Hit the share icon.

On the right side of the screen (or the bottom, depending on if you are using an older device or have the latest UI update), tap the Share icon. It looks like a small paper airplane. This will immediately pull up a menu of sharing options, including sending it to your top contacts.

Step 3: Add to Your Story

At the bottom of this pop-up menu, you will see a prominent option that says "Add to story" or features a plus icon sitting next to your profile picture. Tap this button without hesitation.

Step 4: Format, Tweak, and Publish

Instagram will now magically transport your Reel into the native Story editor. This is where the magic happens. Here, you can pinch your screen to zoom the video in or out. You can drag it around the screen to center it, or push it to the top so you can write a long caption underneath it. Once you are totally satisfied with the layout and spacing, tap "Your Story" in the bottom left corner to publish it to your followers. It's live!

3. How to Share Another Creator's Reel (And Why You Should)

You don't have to be the sole creator of the content you share. Curating high-quality, niche-relevant Reels from others keeps your Stories active and prevents creative burnout.

The Power of Curation

Sharing informative Reels from complementary creators (e.g., a fitness coach sharing a dietitian's meal prep tip) provides free value to your audience while positioning you as a resourceful industry expert.

Effortless Networking

When you share a creator's Reel to your Story, their inbox receives a notification. This simple act of goodwill puts you on their radar, frequently leading to reciprocal shares, future collaborations, and relationship-building within your niche.

To boost your engagement and ensure your content doesn't get lost in the feed, you can follow this step-by-step guide on how to share a Reel to your Story for both Instagram and Facebook.

A side-by-side comparison of an Instagram Reel shared to a Story on two smartphones. The left screen shows the 'Default Instagram Gradient Background' with a red 'X' icon, demonstrating a messy, unbranded look. The right screen shows the 'Magic Draw (Solid Brand Color)' hack with a green checkmark, demonstrating a clean, professional framing of the video against a dark green background.

4. Aesthetic Hacks: Changing the Background Color Behind Your Reel

Okay, let's talk design. One of the single biggest complaints about sharing Reels to Stories is the incredibly ugly, default, automated gradient background Instagram automatically generates. It almost never matches your branding, it clashes with the video, and quite frankly, it looks messy and unprofessional. Fortunately, there is a quick, built-in design hack to fix this in under five seconds.

The Magic Draw Tool Method

Once you have imported the Reel into your Story editor, you don't have to settle for that gradient. You can completely change the background color to a solid shade that matches your brand aesthetic perfectly.

The Exact Execution Steps

  1. Tap the three dots (or the squiggly line icon, depending on your phone) at the very top of the Story editor screen.
  2. Select the Draw tool from the dropdown menu.
  3. Look at the color picker at the bottom of your screen. You can select a standard color, or—better yet—use the little eyedropper tool on the far left to pull a highly specific, complementary color directly from the Reel itself (like the color of your shirt or a graphic in the video).
  4. Tap and hold your finger down anywhere on the empty background of the screen for about two full seconds.
  5. Boom. The entire background will flood with your chosen solid color, leaving the Reel perfectly framed in the center. Your story just went from amateur to professional in two seconds.

5. The "Camera Roll" Trick for a Cleaner Story Aesthetic

If a solid color isn't enough for your brand guidelines, or if you just want to stand out from the sea of boring stories, you can take your aesthetic a massive step further. You can actually layer images from your camera roll over the background. This is the ultimate, closely guarded design hack for hiding the bulky native Instagram UI elements (like the original creator's handle, the annoying play button, and the audio track info) to create a seamless, customized look.

How to Do It Like a Pro

First, get your Reel into the Story editor. Next, shrink it down slightly so it's out of the way. Now, completely leave the Instagram app and go to your phone's native photo gallery. Find a beautiful, branded image—maybe a textured background, a landscape, or a custom graphic you made in Canva. Copy that photo to your phone's clipboard.

Jump back into Instagram. Open the text tool (the "Aa" icon) and hit "Paste." Your photo will pop onto the screen. Enlarge this image so it covers the entire screen completely, hiding the Reel.

Here is the trick: gently tap the area where you know the Reel is hiding behind the photo. The Reel will suddenly pop to the front, sitting perfectly on top of your custom image! This creates a bespoke frame that looks professionally designed, keeps your Story feed visually cohesive, and makes people wonder, "How did they do that?"

A close-up, stylized 3D graphic of a person's hands holding a smartphone displaying an Instagram Story interface with various faces and interactive elements. Surrounding the phone, colorful 3D icons like thumbs-up symbols, arrows, and Instagram logos float against a bright blue background, representing high user engagement and strategic story sticker interaction.

6. Boosting Interaction with Strategic Story Stickers

A shared Reel sitting by itself on a screen is completely passive. To truly capitalize on the 2026 Instagram algorithm, you must transform passive, bored viewers into highly active participants. The longer users spend physically touching and interacting with your Story, the more the algorithm registers it as "highly engaging content" and pushes your little circle to the front of the queue for all your followers.

Leveraging the Classic Poll Sticker

Never post a Reel without a reason for them to interact. Layer a Poll sticker over your shared Reel. For example, if you share a Reel detailing two different SEO marketing strategies, ask your audience, "Which one do you prefer for your business?" with a simple A/B poll ("Strategy A" vs "Strategy B"). People love giving their opinions.

Using the Quiz and Slider Stickers

Quizzes are fantastic for educational or myth-busting Reels. Test your audience's knowledge on the topic you just shared. Make the wrong answers funny to keep them engaged. Alternatively, use the emoji slider sticker. Let your followers drag the fire emoji to rate the outfit, the recipe, or the business tip featured in the Reel. It requires zero brain power from them but counts as a massive engagement point for you.

The Viral "Add Yours" Sticker

If the Reel is trend-based, relatable, or shows off a specific lifestyle moment, use the "Add Yours" sticker. Prompt your followers to share their own take on the trend. For example, if you share a Reel about your morning coffee routine, use an "Add Yours" sticker that says "Show me your current coffee setup." This creates a viral, compounding loop and drastically increases the weight of your Story.

7. Troubleshooting: Why Can’t I Share This Reel?

We've all been there. You find the perfect Reel, you tap the paper airplane icon, and... nothing. The "Add to story" button is mysteriously missing. It's incredibly frustrating. Before you throw your phone across the room, understand that there are a few very common roadblocks that cause this issue, and most of them are easily explained.

Account Privacy Settings

First, check the original poster's account privacy settings. If the creator has a private account, Instagram completely restricts their content from being shared to public Stories. This is to protect their privacy and ensure their content stays within their approved circle of followers. You can't bypass this.

Copyrighted Audio Restrictions

Second, look at the audio track. The music industry is strict. If the Reel uses copyrighted music that is suddenly blocked in your specific region, or if you are running a professional/business account and the audio is only licensed for personal accounts, Instagram will immediately disable the sharing feature to prevent copyright infringement.

The Dreaded Glitch

Lastly, let's blame the app itself. Temporary app glitches are incredibly common in 2026 as Meta constantly rolls out backend updates. If you know for a fact the account is public and the audio is completely safe, try the IT crowd's favourite advice: force-close the app entirely, clear your phone's cache, or jump into the App Store/Google Play Store to see if you are missing a critical update. Usually, a quick restart fixes the missing button.

To maximise your Instagram growth and conversion rates in 2026, you can leverage official Meta API-compliant tools like InstantDM to automate personalised "Comment-to-DM" triggers and AI-driven lead qualification while strategically using "Trial Reels" to reach new audiences and resharing high-performing content on your Stories to bypass feed congestion and capture immediate attention.

A side-by-side comparison of an Instagram Reel shared to a Story on two smartphones. The left screen shows the 'Default Instagram Gradient Background' with a red 'X' icon, demonstrating a messy, unbranded look. The right screen shows the 'Magic Draw (Solid Brand Color)' hack with a green checkmark, demonstrating a clean, professional framing of the video against a dark green background.

8. Tagging Best Practices to Encourage Reshares

When you share a Reel—especially one featuring other people, big brands, physical locations, or complementary businesses—tagging is your absolute best friend. Tagging drastically increases the chances of getting a repost to their audience. When a bigger account reposts your story, it exposes your profile to thousands of new, warm leads who would have never found you otherwise.

Loud and Proud: Visible Tags

Use visible tags when you want to explicitly shout out a collaborator, say thank you, or give direct credit. Ensure the text is large enough to be tapped easily by clumsy thumbs. Add a little graphic arrow pointing to their handle so people know to click it.

The Sneaky "Invisible" Tag Trick

Sometimes, adding a bunch of @mentions ruins the beautiful, clean aesthetic you just built. Enter the "invisible" tag trick. Type out the @mention using the text tool. Then, use your fingers to shrink the text down as tiny as it will possibly go. Finally, hide it completely behind the Reel itself, or blend it entirely into the background by using the color picker to match the text color exactly to the background color.

The genius part? The tagged account still receives a direct message notification saying you mentioned them, and they still get the button that allows them to add it to their own Story! But to your viewers, your design remains pristine and uncluttered.

To keep your followers entertained with fresh content without cluttering your main feed, you can follow this comprehensive Instagram Reels guide to learn how to effortlessly share engaging videos to your Story.

9. Timing it Right: When to Repost Reels to Stories

Timing is absolutely everything in social media strategy. Most people make a massive mistake here: they instinctively share their newly published Reel to their Story the exact second it goes live on their feed. Stop doing this.

The 12-to-24-Hour Delay Strategy

Instead, you should strategically distribute your content to maximise the algorithm's potential. A highly effective, battle-tested strategy is aggressively delaying the Story share by 12 to 24 hours after posting the Reel.

Here is why this approach works: When you hit publish on a Reel, let it naturally and organically gather momentum on the main feed and the Explore page for the first day. Allow the algorithm to operate independently. Then, the next day, just as that initial organic reach inevitably begins to dip and plateau, share it to your Story.

This gives the piece of content a powerful secondary push. It effectively doubles its lifespan. More importantly, it catches the entire segment of your audience that was busy at work, sleeping in a different time zone, or just didn't log onto the app the day before. You have the opportunity to reach your audience twice instead of once.

10. Creating a Loop: Directing Story Traffic Back to Your Feed

Let's clarify the objective here. The ultimate goal of sharing a Reel to your story is not just to get superficial story views; it is to physically move users, getting them to click through and watch the full, looping video on your main feed. Why? Because on your feed, they can like, comment, save, and share the post—the metrics that actually trigger virality.

To create this psychological loop, you need strong visual cues. Instagram deliberately obscures part of the Reel and mutes it when it is shared to a Story. You need to use this limitation to your extreme advantage.

Building the Curiosity Gap

Add bold text overlays that build a curiosity gap. Write things like, "You will not believe step 3... Tap here to watch the full video!" or "Wait until the end to see the results... tap to watch!"

Don't stop at text. Go into the GIF search and find a massive, flashing, animated arrow sticker. Point it directly in the center of the reel. This psychological and visual prompt violently interrupts their mindless scrolling and heavily encourages the physical action of clicking through to your profile. You have to tell people exactly what to do, or they won't do it.

A landing page for InstantDM, a Meta Official Business Partner tool for Instagram automation. The headline reads

11. Managing the Influx of Engagement: Automating Story Replies

If you implement all the steps above correctly, you are going to run into a problem. But it's a very, very good problem to have. As your Reels gain serious traction and your Story views skyrocket, you will encounter a massive influx of direct messages. When a shared Reel strikes a chord, your followers will reply to your Story with fire emojis, profound questions, and rapid-fire reactions.

The Burnout of the Inbox

Trying to handle this sudden spike in DMs manually is inefficient, exhausting, and practically impossible for scaling brands or busy creators. You can't sit on your phone for 8 hours a day typing "Thanks!" to 500 different people. You have a business to run.

The Relief of Story Mention & Reply Triggers

Smart, modern marketing automation is precisely what you need in this situation. The overarching strategy here is to turn casual, fleeting story replies into deep, meaningful conversations without physically living inside your inbox.

By seamlessly connecting a trusted, Meta-approved platform like InstantDM to your account, you can step away from the phone. You can set up a system that automatically sends a warm, personalised response the exact second a follower reacts to your story.

Saving Hours While Increasing Connection

Imagine this scenario: someone replies to your shared Reel with a simple clapping emoji. Instead of that message sitting unread for three days, your automated workflow instantly replies, "Hey [Name], so glad you loved this Reel! Since you liked that one, have you seen our latest free guide on this topic?"

This immediate, personalized touchpoint does three things: it instantly nurtures the relationship, it keeps the audience highly engaged while they are still online, and it saves you countless hours of grueling manual community management—all while keeping your brand highly responsive 24/7. It is the ultimate growth hack.

12. Using Call-to-Actions (CTAs) to Drive Traffic from Stories

Let's talk about the bottom line: making money and capturing leads. To truly monetize your Instagram Stories in 2026, you must completely stop relying on the outdated, lazy "Link in Bio" tactic. People are lazy. If you tell them to leave your story, go to your profile, find a Linktree, and hunt for a button, you will lose 80% of them along the way. You need direct inbox delivery.

The "Reply with a Keyword" Revolution

Currently, the most effective strategy for driving traffic is to overlay clear CTA text directly on your shared Reel.

For example, if you share a Reel teasing a brand new product launch or a new coaching programme, overlay massive text that says, "Reply with the word 'LINK' to get the full video and a secret 20% discount!" ### Setting Up Keyword-Triggered Auto-Replies for Frictionless Sales

Now, instead of staring at your screen, manually monitoring your inbox, and copy-pasting the URL to every single person who types 'LINK' over the next 24 hours, you utilise a keyword-triggered auto-reply.

Using a visual, no-code flow builder, such as the intuitive system offered by InstantDM, you simply set a straightforward rule: whenever a user types the exact keyword "LINK", the software instantly and safely delivers the landing page URL directly to their DM inbox.

This keeps the user journey incredibly smooth and frictionless. The viewer doesn't have to leave the app, open a browser, or search for your website; the golden link is handed directly to them in a private message while they are highly motivated. This seamless process significantly boosts your conversion rates, guarantees that no lead goes unnoticed, and generates direct sales automatically while you rest.

13. Analysing Story Metrics: What Defines a Successful Share?

So, you've shared the Reel, you've added the custom background, you've placed the poll sticker, and you've set up your automation. How do you actually know if your Reel-to-Story strategy is working? You can't manage what you don't measure. You need to dive deep into your native Instagram insights.

Wrapping up these actionable tips requires understanding which specific metrics actually matter for measuring your Return on Investment (ROI) and which are just vanity numbers.

Below is a comprehensive breakdown of the most critical Story metrics you absolutely must track in 2026:

Metric What it Actually Means How to Drastically Improve It
Link Clicks / DM Replies The holy grail. The exact number of people who took a direct action to learn more, download, or purchase. Use much stronger, bolder CTAs and automate keyword delivery to remove all friction.
Profile Visits Viewers tapped the Reel or your name from your Story to travel back to your main grid. Use mystery, blurred images, or cliffhanger text on the Story to mentally force them to click through.
Taps Forward Viewers got bored and skipped your Story to go to the next slide. (A high number here is very bad). Keep your text brief, use engaging interactive stickers immediately, and maintain a visually clean, uncrowded aesthetic.
Exits The worst metric. Viewers swiped out of the Instagram app entirely while watching your Story. Ensure the Reel you shared is actually interesting and provides immediate hook value within the first 3 seconds. Stop sharing boring content.
Interactions The aggregate total of sticker taps, polls answered, emoji sliders dragged, and general engagement. Frequently utilize Polls and Sliders layered strategically on top of the shared Reel. Ask better, more polarizing questions.

The Importance of A/B Testing

Don't just look at these numbers once and forget about them. Monitoring these metrics closely allows you to conduct A/B testing. Next week, try sharing a Reel with a bright red background instead of blue. Check the metrics. The week after, try delaying the repost by 48 hours instead of 12. Check the metrics. Change your CTA keyword from "LINK" to "SEND IT". Testing different variables is the only proven way to see what yields the highest conversion rate for your highly specific audience.

Conclusion

We have covered a massive amount of ground today. Sharing a Reel to your Instagram Story is no longer just a lazy way to fill up your 24-hour feed; it is a simple yet incredibly powerful, multi-layered tactic to significantly amplify your hard-earned content's lifespan.

By utilizing built-in customization tools to maintain your professional aesthetic, forcing engagement with strategic stickers, and adding a brilliant layer of smart DM automation to handle the influx of traffic, your Stories completely transform. They evolve from a basic, passive broadcasting tool into a highly interactive, 24/7 lead-generating machine.

As the digital marketing landscape continues to rapidly evolve in 2026, working smarter is infinitely more important than just working harder. Stop manually replying to every DM. Stop posting naked Reels with ugly backgrounds. Start experimenting with different brand colors, engaging questions, and optimized DM workflows to see what truly resonates with your unique audience. Take one hour today to implement these exact steps, and watch your engagement metrics—and ultimately your sales revenue—soar to levels you didn't think were possible. You have the blueprint; now go execute it.

Sakthivel

Sakthivel

Social Media Expert excelling in Online Selling and Ecommerce.

Frequently Asked Questions

1. Why is the "Add to Story" button missing on a Reel?

If you cannot find the paper airplane icon or the option to add a Reel to your Story, it is typically due to one of two reasons: the original creator has a private Instagram account, or they have manually disabled the resharing feature in their account's privacy settings to prevent others from distributing their content.

2. How much of the Reel will actually play on my Instagram Story?

Thanks to recent platform updates, Instagram Stories now support up to 60 seconds of continuous video playback. If you share a Reel that is 60 seconds or shorter, it will play in its entirety on a single Story slide without being chopped up. If the Reel is longer than 60 seconds, viewers will need to tap the video to continue watching the rest on the actual Reels feed.

3. Does watching a Reel through a Story count as a view for the original video?

Yes. When a viewer watches a Reel that has been embedded into an Instagram Story, the algorithm officially registers it as a view for the original Reel. This is exactly why sharing your own Reels to your Stories immediately after publishing is a highly effective strategy to spike your initial view count and generate algorithmic momentum.

4. Can I hide the Instagram Reels icon and username when sharing to my Story?

While you can tap the Reel sticker while editing your Story to change its visual aesthetic (toggling between a full-frame view and a stylized card with a caption), you cannot organically remove the original creator's username or the Reels watermark. Instagram strictly enforces this to ensure original creators receive proper attribution for their work.

5. Is there a way to automatically share my new Reels to my Story?

Currently, Instagram does not provide a native toggle to automatically publish a Reel to your Story at the exact moment it goes live on your grid. You must manually execute this strategy by opening your newly published Reel, tapping the share icon, and pushing it to your Story as a secondary action.

Ready to automate your Instagram DMs?

Join thousands of creators and brands using InstantDM to grow their audience.