TL;DR
Quick Summary: In 2026, Instagram allows professional accounts (Creators and Businesses) to natively schedule posts, carousels, and Reels up to 75 days in advance for free. Desktop users can leverage Meta Business Suite for bulk planning and cross-platform automation. While scheduling does not hurt algorithmic reach, "setting and forgetting" your content can kill engagement. To maximize results, successful brands pair automated posting with Comment-to-DM tools to instantly capture leads and boost organic distribution.
1: Foundations & Account Settings
1. The Quick Answer: Instagram’s 2026 Native Scheduling Capabilities
Yes, you can schedule posts, Reels, and carousels directly on Instagram without leaving the app or paying for a third-party tool. Instagram includes built-in content scheduling directly inside its mobile interface for professional accounts. Users can schedule standard grid images, multi-slide carousels, and high-performance Reels up to 75 days in advance.
For desktop-first creators, agencies, and brands, Meta provides advanced, free scheduling options via Meta Business Suite. For teams scaling large operations across multiple brands, the official Meta Graph API allows seamless integration with third-party software platforms. Whether you are a solo creator or a high-growth brand, manual, real-time publishing is entirely optional.
This evolution in native functionality represents a massive shift in how Meta handles creator workflows. In earlier iterations of the platform, publishers were forced to rely on clunky, third-party workarounds that often required manual push notifications to complete the publishing process. Today, the native cloud infrastructure fully processes heavy video assets and multi-slide carousels well ahead of time. This backend reliability ensures that your brand remains active during holidays, weekend closures, or timezone gaps without requiring a live team member to click "Publish." Furthermore, optimizing your workflow through free native scheduling protects small business budgets, allowing resource allocation to move from basic operational tasks directly into high-impact visual production.
2. Account Prerequisites: Switching to a Professional, Creator, or Business Profile
If you look through your Instagram app settings and cannot find the scheduling options, it is likely because you are still using a personal account. To safeguard platform infrastructure and combat spam, Meta restricts native scheduling and API access to professional profiles. Personal profiles must publish all content manually in real time.
Switching to a Professional profile is completely free, takes less than 60 seconds, and does not require a public business registration.
[Open Instagram Profile] ➔ [Menu / Settings & Privacy] ➔ [Account Type and Tools] ➔ [Switch to Professional Account]
Choosing between a Creator or Business account depends entirely on your specific monetization and operational model:
- Creator Accounts: Best suited for solo influencers, public figures, and content artists. They offer full access to Instagram’s music library for Reels, along with deep audience demographics and insights.
- Business Accounts: Designed for local businesses, e-commerce brands, agencies, and organizations. While commercial music licensing limits certain trending audio options, Business profiles unlock access to third-party scheduling tools, API integrations, and direct link-sharing vectors.
Once your profile updates, your dashboard will display a Professional Dashboard section, and your backend options will unlock native scheduling access. This structural switch does more than just reveal a scheduling button; it completely rebuilds your backend dashboard metrics. A professional profile grants you detailed charts showing exactly who is interacting with your content, where they live, and how they discovered your page. For individuals hesitant to make the switch out of privacy concerns, the Creator profile allows you to completely hide your business category label, maintaining a streamlined profile aesthetic. Making this update ensures your account architecture aligns with Meta’s official developer protocols, opening the door for automated workflows that grow your brand footprint while you sleep.
3. Instagram Live vs. Scheduled Content: The Algorithmic Impact
A persistent myth across social media spaces claims that scheduling content via the native app or third-party platforms reduces its organic reach. The theory suggests that Instagram's algorithm favors real-time, live uploads because they signal authentic user presence.
This is entirely inaccurate. Meta executives and engineering teams have repeatedly clarified that the distribution algorithm evaluates content quality and audience engagement signal metrics entirely independently of the publishing mechanism.
The algorithm tracks how long users look at your content, whether they save it, forward it to friends via DMs, or write a reply. Whether a post drops via a scheduled API trigger at 4:00 AM while you are asleep or via a manual tap while you are active online, the distribution engine processes the content identically.
In fact, scheduling often improves performance. It ensures consistency and allows you to target peak audience activity hours with precision, rather than rushing a manual post during a busy workday. This mathematical truth highlights why a strategic content calendar outperforms erratic, live updates. When a post drops on a reliable schedule, your core audience develops a routine around consuming your material, driving up early watch times and save metrics. The discovery engine views these swift interaction signals as an endorsement of quality, accelerating your placement on the Explore page. Instead of worrying about the mechanics of how your content gets on the platform, focus your energy on creating high-value assets that encourage saves and shares—the primary metrics that signal algorithmic value.

Phase 2: Mobile-Based Instagram Scheduling (Step-by-Step)
4. Scheduling Feed Posts & Carousel Content Directly From the Instagram App
Instagram’s built-in scheduling system allows users to plan both single-image posts and multi-slide carousel content directly from their mobile device without relying on external tools.
Start by opening the Instagram application and tapping the [+] icon located either at the top or bottom of the interface to begin creating a new post.
Choose either:
- a standard single-image post,
- or a Carousel format with multiple slides (up to 20 media items).
Tap Next, then apply any necessary edits such as:
- filters,
- cropping,
- lighting adjustments,
- or color balancing.
On the final publishing screen:
- write your caption,
- add alt-text for accessibility,
- tag relevant accounts,
- and attach location data if necessary.
Next, scroll to the bottom of the page and open Advanced Settings.
Inside the scheduling section, activate the “Schedule this post” option.
Instagram will display a scheduling interface where you can choose:
- your publishing date,
- and your preferred posting time.
After selecting your slot, tap Set Time.
Return to the previous screen using the back arrow. The normal Share button will now appear as a Schedule button. Tap it to confirm your scheduled post.
Mastering this workflow is especially important for creators who prefer managing content natively inside the Instagram mobile app.
It is also strongly recommended to complete your alt-text setup during this stage, since descriptive image metadata can improve visibility within Instagram’s keyword indexing system.
Before scheduling multiple posts consecutively, preview your grid layout carefully. Instagram publishes content in the exact order it is scheduled, meaning poorly sequenced uploads can disrupt:
- visual grid patterns,
- puzzle-feed layouts,
- or branded color consistency.
Spending a few extra minutes verifying your publishing sequence helps preserve your profile’s overall visual identity.
5. The Step-by-Step Guide to Scheduling Instagram Reels
Because short-form video serves as Instagram's primary organic discovery engine, scheduling Reels keeps your growth funnel active around the clock.
- Tap the [+] button and select the Reel format option. Upload your pre-edited vertical video file ($1080 \times 1920$ resolution) or assemble your clips directly inside the native builder.
- Add audio tracks, sound design, and text overlays. Tap Next to access the final publishing options.
- Tap Edit Cover to select an exact video frame or upload a dedicated thumbnail image from your camera roll. Ensure the cover displays cleanly in both the 9:16 vertical view and the 1:1 grid preview.
- Add your description, include keywords for search optimization, select your topic tags, and tag collaborators using the Invite Collaborator option if working on a joint project.
- Scroll down to the bottom and open Advanced Settings.
- Toggle on Schedule this Reel and configure the calendar wheel to your desired release window.
- Go back to the main layout page and tap the Schedule button at the base of your screen. Your video file will upload to Meta’s cloud repository and queue for delivery.
When managing short-form video, video processing constraints require extra attention. High-resolution 4K video exports with complex frame rates can occasionally freeze during the background cloud upload if your local mobile connection drops out. For best results, keep your phone awake and connected to a stable Wi-Fi network until the progress bar completes its upload loop. Additionally, double-check that any text overlays sit well within the "safe zones" of the 9:16 frame. This ensures your text won't be covered by account usernames or description text once the video drops into the active feed on autopilot.
6. Managing Your Mobile Queue: How to Edit, Reschedule, or Delete Pending Posts
Once your items are scheduled, you may need to tweak a caption, swap a hashtag, adjust a date, or delete a post entirely. These queued elements live inside a dedicated, hidden interface within your app.
To open and manage your active content queue:
- Go to your primary Instagram profile view and tap the three horizontal lines in the top right corner to open your account settings.
- Locate and tap the item labeled Scheduled Content. This section displays your upcoming posts chronologically.
- Tap the three dots (...) icon sitting directly in the corner of any item in the queue.
- Select your desired action from the pop-up menu:
- Delete: Permanently wipes the post from the cloud queue.
- Reschedule: Reopens the calendar wheel to shift the release window.
- Share Now: Bypasses the timer to push the item live instantly.
- Edit: Reopens the text editor so you can refine copy, alter account tags, or adjust location markers without re-uploading your media assets.
This operational command center gives you complete control over your content pipeline, making it easy to adapt to real-world updates. For example, if a sudden industry news breaking event renders an upcoming scheduled post irrelevant or insensitive, you can quickly jump into this queue from any location to pause or remove the post. One subtle system rule to keep in mind: if you need to radically change the actual video or image file itself, you cannot simply swap the media asset within an existing scheduled post. You will need to delete the specific item from the queue and build a fresh upload from scratch. Keeping a close eye on your scheduled folder ensures your brand remains agile and responsive.
Phase 3: Desktop & Meta Ecosystem Solutions
7. Introduction to Meta Business Suite: Linking Your Assets Safely
For marketing professionals, agency employees, and business owners, handling a high volume of visual assets on a mobile device can be slow and cumbersome. Meta Business Suite is a free desktop management platform that centralizes content operations across Facebook and Instagram.
Before leveraging the desktop dashboard, you must establish a clean connection between your platform assets:
[Meta Business Suite Dashboard]
│
├── Ensure Instagram Account is Professional (Creator/Business)
└── Link to Associated Public Facebook Page (Confirm Page Admin Rights)
- Confirm your Instagram profile is set to a Professional or Business status.
- Create or log into the public Facebook Page that represents your organization or brand identity.
- Navigate to your Facebook Page's settings backend, click Linked Accounts, select Instagram, and click Connect Account.
- Input your Instagram login credentials when prompted to authorize the secure handshake.
With this connection established, go to business.facebook.com on your desktop computer. The interface will display a unified environment where you can manage cross-platform media assets, handle shared message threads, and access advanced publishing tools. Working directly within a desktop framework completely transforms your day-to-day production layout. Instead of dealing with air-dropping assets or squinting at tiny mobile text windows, teams can easily manage brand folders, coordinate with graphic design teams, and write clean, typo-free captions. This integration also creates a secure digital wall around your profiles; by assigning specific roles within Meta Business Manager, you can grant contractors or agencies publishing access without ever sharing your actual account passwords.
8. Master the Meta Planner: Bulk Scheduling via Desktop

The Planner tab inside Meta Business Suite provides a visual calendar dashboard designed for batching content workflows across weeks or months.
To use this setup, click the Create button in the top right corner of the Planner canvas. Select your file assets from your desktop storage, write your caption copy within the main text area, and check the real-time preview boxes for both Facebook and Instagram layout formats.
Instead of choosing immediate publication, select Schedule from the save options, enter your target time slot, and save. Your dashboard will update to show the item queued on the calendar grid. The real power of the desktop planner lies in its ability to handle long-term marketing campaigns visually. Seeing your entire social presence laid out on a grid allows you to easily balance educational carousels with promotional Reels. The platform also includes built-in placeholder slots, letting you map out tentative concept ideas before the final visual assets are even created. This level of structure helps production teams work collaboratively, moving away from last-minute, reactive posting into an organized, proactive marketing workflow.
9. Cross-Platform Automation: Scheduling to Facebook and Instagram Simultaneously
One of the best time-saving features of Meta Business Suite is the ability to build a single post and distribute it across both Instagram and Facebook simultaneously. However, cross-posting the exact same caption can look unprofessional, as audience behaviors, link handlings, and hashtag habits vary significantly between the two networks.
To maximize reach, use Meta's asset customization options:
[Unified Media Upload]
│
├──► [Toggle: Customize Post for Facebook] ──► Text Copy + Direct Hyperlink URLs
│
└──► [Toggle: Customize Post for Instagram] ─► Clean Caption + Optimized Hashtags
The Facebook Variable: Facebook captions easily process long-form copy and direct hyperlink URLs. You can paste a clean, clickable tracking link right into the body text to drive web traffic.
- The Instagram Variable: Instagram captions do not support hyperlinked body text; URLs remain unclickable. For your Instagram version, swap the raw URL string for a clear call-to-action redirecting users to your profile link or an automated DM keyword. You can also place your primary hashtag blocks here to keep your presentation organized.
This split customization feature helps you maintain a polished, professional brand image on both networks. Instead of looking like a lazy brand that copy-pastes content across the web, your posts look tailored to each platform's specific user habits. Taking advantage of these adjustments inside Meta Business Suite allows you to run highly targeted campaigns across both audiences at the exact same time, maximizing your overall digital footprint without doubling your daily design workload.
Phase 4: Third-Party Tools & API Safety
10. Native Scheduling Tools vs. External Dashboards: When Should You Upgrade?
Instagram’s native scheduling features and Meta Business Suite are sufficient for basic publishing needs and are available at no cost.
However, growing brands, agencies, and larger marketing teams often outgrow these built-in systems.
Moving to a dedicated third-party platform becomes valuable when your workflow requires:
Cross-Platform Publishing
Managing Instagram, TikTok, LinkedIn, YouTube, Pinterest, and other channels from one centralized dashboard.
Multi-Brand Account Management
Handling multiple businesses or client profiles without constantly switching Meta logins.
Team Collaboration Systems
Creating approval chains where:
- copywriters draft content,
- designers upload creative assets,
- and managers approve posts before publishing.
Advanced Reporting Infrastructure
Generating branded performance reports that combine:
- engagement metrics,
- conversion data,
- audience trends,
- and campaign analytics.
Using Audience Data to Find Your Best Posting Time
Scheduling content at random times — like 9:00 AM every Tuesday — ignores your actual audience behavior.
The best publishing window is usually right before your followers become most active online.
To identify your account’s ideal publishing window:
- Open your Instagram profile.
- Access the Professional Dashboard.
- Tap Insights.
- Open Total Followers.
- Scroll to the Most Active Times section.
Switch between:
- hourly data,
- and daily activity patterns
to analyze when your audience is online most frequently.
If engagement spikes between 6 PM and 9 PM, scheduling your content around 5:30 PM gives Instagram enough time to process and index the upload before peak audience activity begins.
This increases the chances of your content appearing near the top of follower feeds during high-traffic periods.
11. The Risk of Scraping Tools: Why Official Meta Partners Matter
Choosing the wrong automation platform can place your entire Instagram account at risk.
The market generally contains two categories of tools:
- Official Meta API Partners
- Unauthorized scraping platforms
Official Meta API Tools
- Use secure token-based authorization
- Never require your raw password
- Fully comply with Meta policies
- Present minimal account security risk
Unauthorized Scraping Platforms
- Request direct login credentials
- Simulate fake mobile-device activity
- Violate Meta guidelines
- Carry high suspension and shadowban risks
Official platforms connect through Meta’s secure authentication systems. Instead of giving away your Instagram password, you approve permissions directly through Meta’s login portal.
This protects both:
- your account security,
- and your long-term profile health.
Unauthorized platforms often advertise aggressive features that exceed official API limitations. To operate, these services rely on automated scripts that imitate human activity behind the scenes.
Meta’s security systems actively detect this behavior.
Using these tools can trigger:
- reach suppression,
- account lockouts,
- verification loops,
- or permanent account bans.
Always confirm that any platform you use is an approved Meta Partner.
Many scraping tools attract users by promising risky automation features such as:
- mass following,
- competitor data extraction,
- or profile scraping.
To deliver these functions, they bypass Meta’s security systems entirely.
Providing your raw credentials to these platforms effectively gives external servers full access to your account.
Meta continuously scans for suspicious activity patterns such as:
- rapid IP address changes,
- repeated automated requests,
- or server-based login simulations.
Once detected, Instagram may:
- limit your reach,
- remove content from discovery feeds,
- or permanently disable the account.
Choosing verified Meta-approved tools is not just a security preference — it is essential brand protection.
12. Understanding Pricing Models: Contact-Based Costs vs. Flat-Rate Scaling
When evaluating social media software, carefully examine how pricing scales as your audience grows.
Many traditional platforms still use outdated pricing systems tied to:
- follower count,
- email subscribers,
- or database size.
Under this model, business growth increases your monthly expenses automatically.
As your audience expands, you are pushed into increasingly expensive subscription tiers simply because your marketing is performing well.
Modern software providers increasingly use flat-rate pricing structures instead.
These plans typically scale based on:
- connected accounts,
- feature access,
- or team seats,
rather than audience size.
Traditional Contact-Based Pricing
- Costs rise as audiences grow
- Viral campaigns increase software expenses
- Budget forecasting becomes difficult
Flat-Rate Pricing Models
- Stable monthly operational costs
- Unlimited audience scalability
- Better support for aggressive growth campaigns
Flat-rate systems create predictable operational expenses, allowing businesses to scale without worrying about increasing software fees.
Contact-based pricing often creates operational friction for marketing teams. As lists grow, companies are sometimes forced to:
- delete subscribers,
- trim contact databases,
- or reduce automation campaigns
simply to avoid crossing pricing thresholds.
This slows long-term growth and wastes valuable operational time.
Flat-rate systems remove those limitations completely.
Whether your brand grows to:
- 10,000 followers,
- 100,000 followers,
- or beyond,
your software expenses remain stable and predictable.
This allows businesses to align operational costs with controllable factors like:
- staff seats,
- platform access,
- or connected profiles,
instead of penalizing audience growth itself.
Phase 5: Advanced Content Strategy for 2026
13. Finding Your Account's "Golden Hours": Analyzing Audience Insights

Scheduling a post for an arbitrary time, like 9:00 AM on a Tuesday, ignores your brand's actual audience data. The best time to schedule content is right before your specific followers are most active online, which creates an initial wave of organic engagement.
[Open Instagram App] ➔ [Professional Dashboard] ➔ [Total Followers] ➔ [Scroll to: Most Active Times]
To find your account's unique "Golden Hours":
- Navigate to your Instagram profile view on your mobile app and open the Professional Dashboard.
- Tap on Insights and select Total Followers.
- Scroll to the bottom of this interface to locate the Most Active Times data module.
- Toggle between Hours and Days to view your audience's online patterns.
Look for the hours where your active user curve climbs sharply. If your chart peaks between 6:00 PM and 9:00 PM, set your schedule timer for 5:30 PM. This gives Instagram's asset servers time to index your upload, ensuring it sits at the top of feeds right as your audience opens the app.
Relying on generic internet suggestions for your posting times guarantees your content will get buried in crowded feeds. Every target market follows its own unique online routine. An e-commerce brand selling athletic wear to fitness enthusiasts will see audience spikes during early morning gym windows or weekend training slots, while a business-to-business consulting agency will find its peak engagement during mid-week lunchtime breaks and afternoon office windows. If you schedule your content blindly without checking these usage patterns, you risk dropping your best material into quiet windows where no one is online to see it.
When content drops into an empty feed, its early velocity score drops to zero, signaling to the algorithm that the asset is low-value. By tracking your built-in dashboard metrics, you can identify exactly when your unique audience opens the app. Setting your content to drop thirty minutes prior to this daily usage peak ensures that your scheduled post is completely indexed and ready to show up at the very top of user feeds. This data-driven precision maximizes early views, likes, and shares, signaling high value to the algorithm and boosting your organic reach.
14. The Limitations of Scheduling: What Cannot Be Programmed Ahead of Time?
While automation handles most publishing tasks, certain interactive elements on Instagram still require a manual touch. Understanding these boundaries helps you plan your content calendar realistically.
- Interactive Story Elements: You can schedule basic image and video Stories via Meta Business Suite, but interactive stickers like native polls, question boxes, sliders, and countdown timers cannot be automated ahead of time.
- Broadcast Channel Broadcasts: Messages, voice notes, and updates pushed to your dedicated Broadcast Channel must be sent live.
- Instagram Live Events: Going live requires real-time video streaming, though you can schedule a text-based "Live Event Notification Post" to prompt your audience to sign up for reminders beforehand.
- Collaborative Tag Approvals: While you can schedule a post with an invited collaborator, the post won't appear on their grid until they log in and manually accept your invitation after it goes live.
Recognizing these core limitations keeps your team from building unexecutable marketing campaigns. For instance, a common mistake is designing an entire flash-sale campaign around interactive Story stickers, only to realize the third-party planner cannot publish those custom engagement elements automatically. When a scheduled Story goes live through an external software tool, it strips away native engagement stickers, leaving a flat image that users cannot interact with.
To bypass this platform limitation, successful brands use a hybrid publishing strategy. They use scheduling software to handle foundational feed media, carousels, and Reels automatically. Then, they layer in real-time, manual interaction for high-touch formats like live Q&A sessions and interactive Stories. This approach keeps your feed consistently active through automation while focusing your team's live energy on high-engagement, real-time moments that build deep community trust.
15. Scheduled Post Problems: Why Your Content Isn’t Publishing
Even stable scheduling systems occasionally fail due to technical issues. Below are the most common reasons scheduled Instagram posts stop publishing correctly — along with the solutions used to fix them.
Expired API Access Tokens
For security reasons, Meta regularly refreshes third-party authorization tokens every 60–90 days. Changing your password can also instantly invalidate an active connection.
Solution
Open your scheduling platform settings, go to account management, and select:
- Refresh Token
- or Reconnect Account
to restore the authorization link.
Incorrect Media Dimensions
Instagram automatically rejects uploads that fail to match approved aspect-ratio requirements.
Solution
Ensure your content follows Instagram’s supported formatting rules:
- Feed posts:
1:1square or4:5vertical - Reels:
9:16vertical format (1080 × 1920) - File size: below
100MB
Incorrect dimensions often prevent scheduled content from publishing successfully.
Lost Facebook Page Permissions
If your Facebook account loses administrator permissions inside Meta Business Manager, your Instagram scheduling workflows may stop functioning entirely.
Solution
Open your Facebook Page settings and confirm that your account still has:
- full administrative access,
- and complete “Content and Task Management” permissions.
Silent Publishing Errors & Background Failures
Sometimes scheduled posts fail due to hidden platform-level issues.
Examples include:
- copyright-restricted audio,
- unsupported video encoding,
- unstable internet uploads,
- or background Meta system updates.
For instance, if your Reel contains unauthorized commercial music, Meta’s automated copyright system may block the post at the final publishing stage without displaying a clear warning.
To reduce these issues:
- review your scheduled queue weekly,
- verify all assets are approved,
- and monitor notification centers for failed publishing alerts.
If a post fails, both Instagram notifications and third-party publishing logs usually reveal the underlying issue.
Building regular queue-check routines into your workflow helps prevent unexpected campaign interruptions and keeps your publishing pipeline operating smoothly.
Phase 6: Post-Publishing Conversion Mechanics
16. The "Ghost Town" Trap: Why Set-and-Forget Content Fails Without Engagement

The greatest mistake brands make when using scheduling automation is treating their profile like a broadcast television station. They push content out into the world but leave the comment sections empty. This is known as the Ghost Town Trap.
┌───────────────────────────────┐
│ The Ghost Town Trap Loop │
└───────────────┬───────────────┘
│
▼
Post Publishes Automatically
│
▼
Users Leave Inquiries/Comments
│
▼
Account Owner Remains Offline
│
▼
Algorithm Restricts Organic Reach 📉
Instagram tracks engagement velocity: the speed and depth of conversations occurring within a post's comment section during its first few hours online. If users ask questions or leave comments and receive no reply, your engagement velocity stalls out.
The algorithm interprets this silence as dead interest and stops distributing your content across discovery feeds. Scheduling should free you from manual posting, but it shouldn't replace human conversation. To sustain growth, you need a system that handles early engagement from the moment your content drops.
This operational trap highlights why automation requires a thoughtful strategy. When you schedule content to post automatically but ignore the incoming conversations, you throw away valuable organic reach. Instagram’s sorting algorithm doesn't just measure initial likes; it looks closely at the conversation depth in your comment section. When a user asks a question about your product and sits without a response for hours, they lose interest, and your account looks abandoned.
This lack of active engagement tells the platform's distribution engine that the content isn't driving meaningful interactions. As a result, the algorithm pulls the post from discovery feeds, ending its organic reach. To break this negative loop, teams must treat scheduling as a way to free up time for real conversation. The true value of scheduling content ahead of time is that it gives you the space to actively show up in your community tabs, building real-time connections that turn casual viewers into loyal customers.
Pro-Tip: Break the "Ghost Town" Loop Automatically
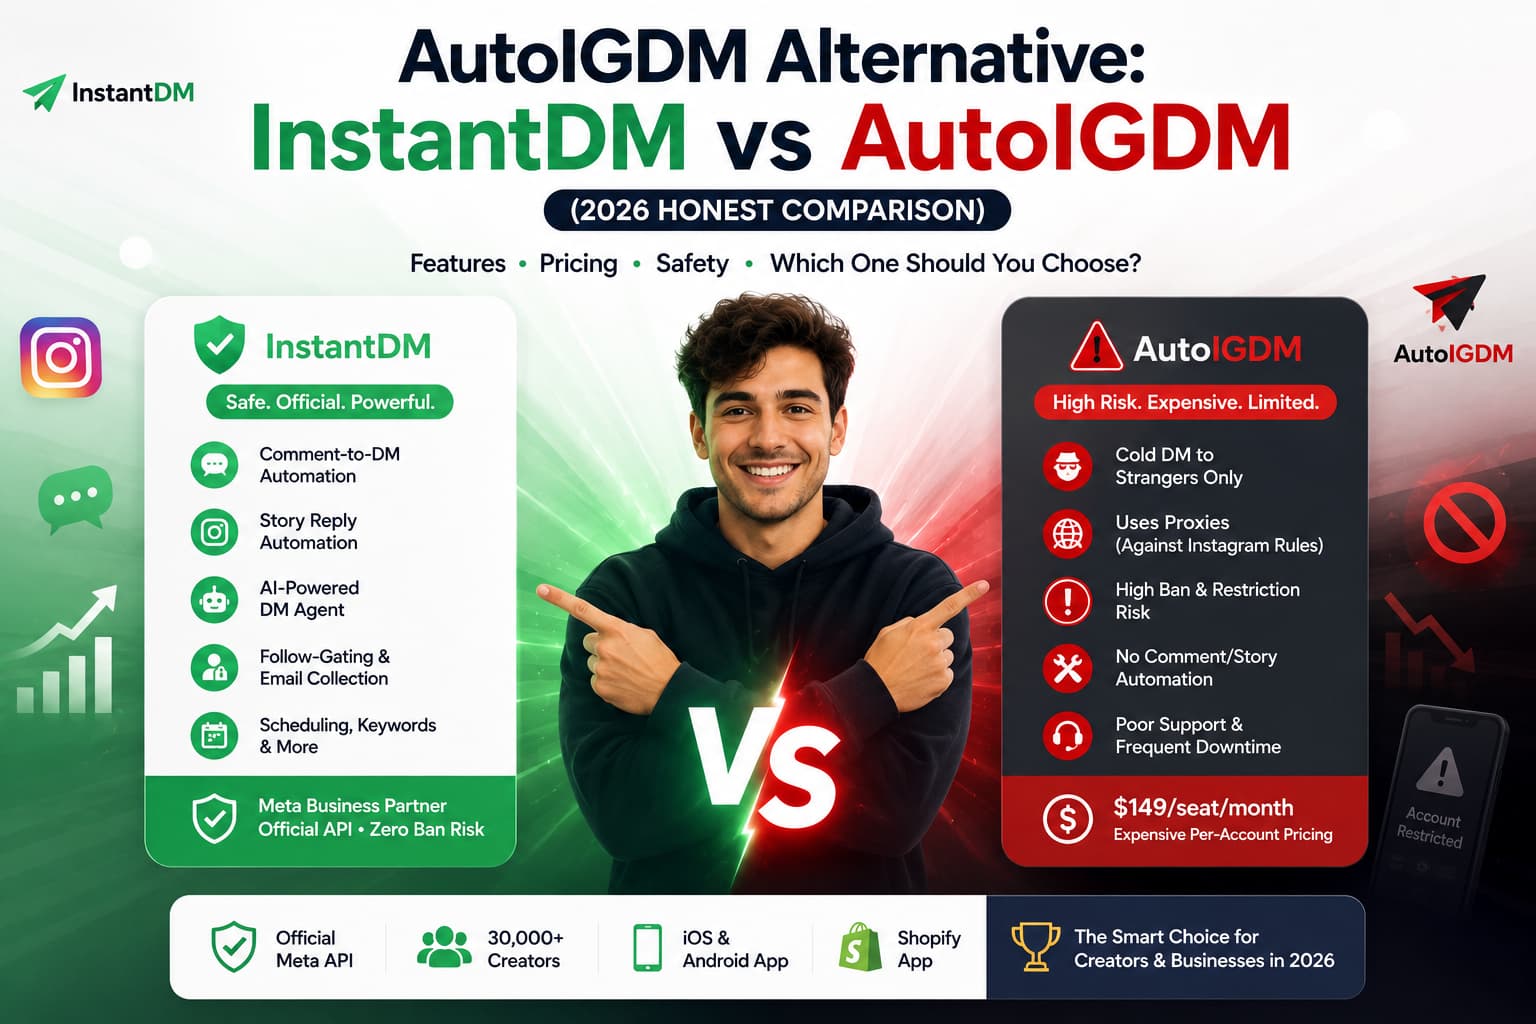
While scheduling ensures your content goes out on time, staying online 24/7 to reply to early comments is nearly impossible for growing brands. Instead of letting your engagement velocity stall out while you sleep, you can use specialized, all-in-one tools like InstantDM to manage the entire pipeline for you.
Beyond just monitoring your comments, InstantDM includes its own built-in post scheduling features, allowing you to queue up your visual assets and map out your automated conversation triggers in the exact same dashboard. It launches your scheduled posts precisely on time and monitors them the second they drop—instantly interacting with your audience so the algorithm keeps pushing your content to the Explore page, even when you're completely offline.
17. Turning Scheduled Views into Automated Leads: Comment-to-DM Setup
To bridge the gap between automated scheduling and active engagement, connect your publishing calendar to official Comment-to-DM funnels. This setup turns every view on your scheduled posts into an immediate lead-generation opportunity.
[Scheduled Post Drops] ──► User Comments Trigger Keyword ──► Meta API Sends Instant DM ──► Lead Captured
Instead of using a generic call-to-action like "Click the link in our bio"—which forces users to stop scrolling and navigate away from their feed—you use an interactive trigger phrase:
"Comment the keyword STRATEGY below, and we'll instantly slide our 2026 organic marketing playbook straight into your DMs!"
When a user replies with that keyword, an official Meta API automation trigger instantly reads the text, publishes a public reply to the comment, and opens a direct message thread to deliver the resource link.
This approach creates a win-win scenario. The sudden surge of user comments signals strong engagement to the algorithm, which boosts your post's organic distribution, while your automated direct messages quietly capture leads and drive traffic entirely in the background.
Moving away from the legacy "link in bio" strategy is essential for modern organic lead generation. Every extra step you force a user to take—like leaving their feed, opening your profile, and clicking an external web link—causes a significant drop in your conversion rates. Most users simply won't bother. Comment-to-DM triggers remove this friction completely, allowing users to opt-in with a single keyword reply while remaining on their active feed.
This frictionless conversion process can easily double or triple your average lead volume overnight. At the same time, this strategy helps satisfy Instagram’s engagement algorithms. As hundreds of users drop keywords into your comments, your post's engagement metrics climb rapidly. This burst of activity signals high value to the discovery engine, pushing your post onto more Explore pages and Reels feeds. This creates a powerful growth loop: higher engagement expands your organic reach, which drives more views, comments, and automated leads directly into your business database.
18. Scaling Your Direct Message Funnel: Moving from Keyword Triggers to Full Conversational AI
Simple keyword automation works well for basic resource deliveries, but modern brands scale their operations by embedding advanced AI Agents directly into their direct message architecture.
When a scheduled post goes live and draws users into your DMs via a keyword trigger, an integrated Large Language Model (LLM) takes over the conversation. Rather than sending rigid, scripted replies, the AI agent can chat naturally with prospects:
- It answers specific questions about your pricing tiers, service features, or business hours.
- It qualifies incoming leads by asking targeted questions about their budget, business goals, or current roadblocks.
It automatically drops direct links to your booking calendar once a prospect meets your client criteria.
This strategy combines the best of both worlds: structural precision and authentic brand personality. By pairing a scheduled content pipeline with a conversational AI agent, you create a highly efficient, automated system that grows your audience, nurtures prospects, and drives revenue 24/7.
Relying on rigid, old-school chat menus often frustrates warm prospects, as static reply buttons cannot adapt to unique user questions. If a prospect replies to an automated message with a specific question about your software integrations or onboarding timeline, a simple keyword bot will fail, breaking the sales experience. Integrating a responsive AI agent fixes this gap completely. These smart assistants analyze the context of every incoming message, offering helpful, personalized responses based on your company's actual data documents.
This fluid conversation style builds immediate brand trust. While your scheduled feed content keeps your public profile highly visible, your AI backend handles the time-consuming work of nurturing leads and moving them through your sales funnel. The agent can gently guide prospects through your qualifying questions, sort them by business size, and share direct booking calendar links to high-value leads. This automated sales system runs continuously around the clock, allowing your business to turn midnight views into qualified appointments without requiring your team to manage live chat threads 24/7.