TL;DR: Create a Professional Instagram Account
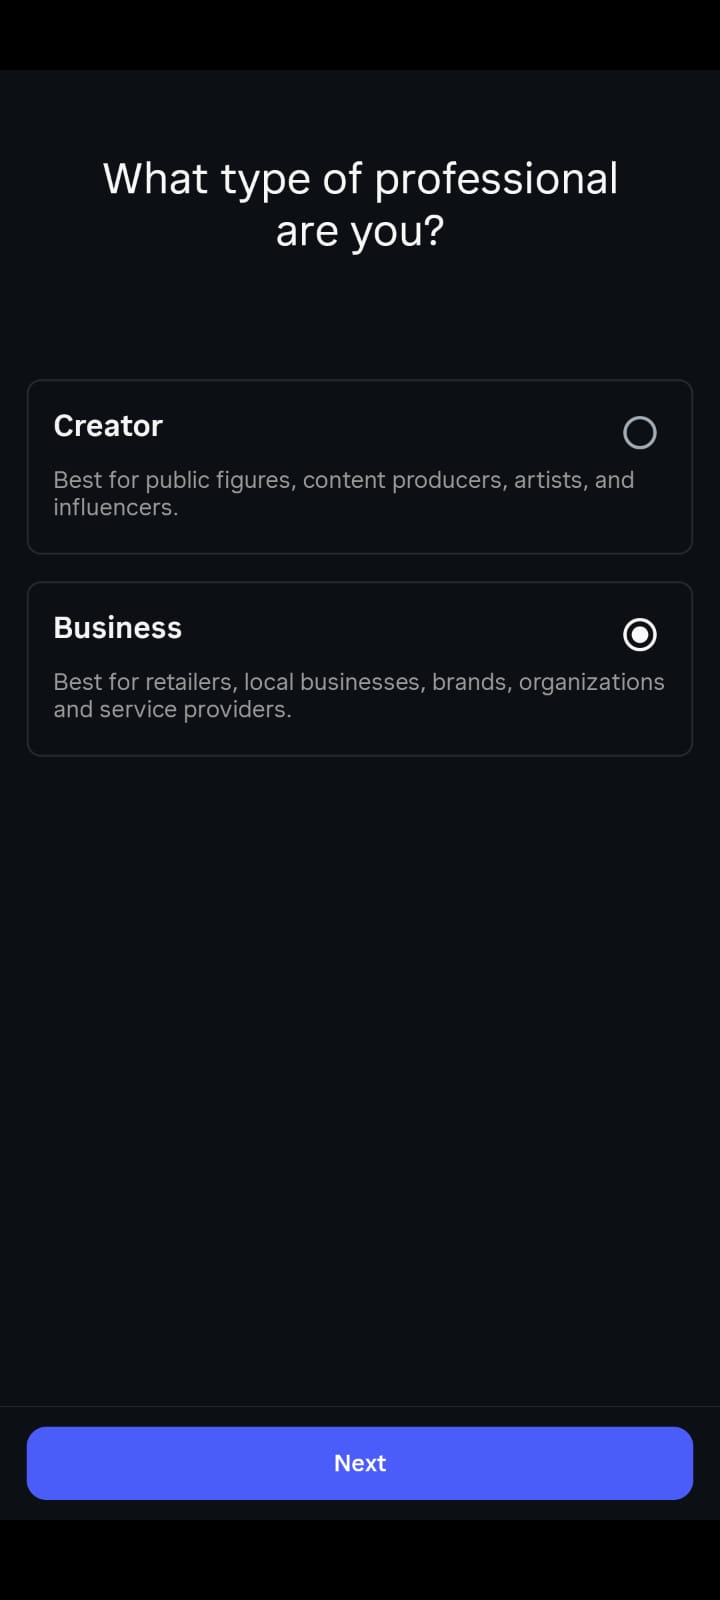
Choose the Right Account: Switch from a Personal profile to a Business Account if you sell products/services, or a Creator Account if you are building a personal brand.
Optimize Your Setup: Use a clean business email, claim a consistent and simple handle (@yourbusiness), and fill out all contact options (email, phone, address, WhatsApp).
Complete Your Profile: Upload a clear logo or headshot, write a 150-character bio stating who you help and what you do, include a call to action, and add a website or Linktree link.
Connect to Facebook: Link your profile to a Facebook Business Page to unlock Meta Ads Manager, Meta Business Suite scheduling, and Instagram Shopping.
Drive 2026 Growth: Focus heavily on publishing 2–3 Reels per week for organic reach, maintain a consistent visual identity, use 5–15 targeted hashtags, and spend 15 minutes a day engaging with comments and messages.
Avoid Key Mistakes: Never buy followers, don't post inconsistently, and don't ignore your Instagram Insights (analytics).
[New option] Add a CTA in Bio - DM Course to know about my course, DM Booking to book call with us.
Instagram has over 2 billion active users worldwide — and the businesses that show up there consistently are winning customers your competitors are missing. Whether you’re a local shop, a freelancer, a brand, or an entrepreneur, a professional instagram account offers you tools that a regular personal profile simply does not have: analytics, ads, shopping features, and the ability to schedule content.
This guide will show you everything from setting up your account in minutes to optimising it like a pro and actually growing it into a revenue-generating channel.
What Is an Instagram Business Account?
Before we get into the setup, it’s good to be on the same page about what “professional” means on Instagram.
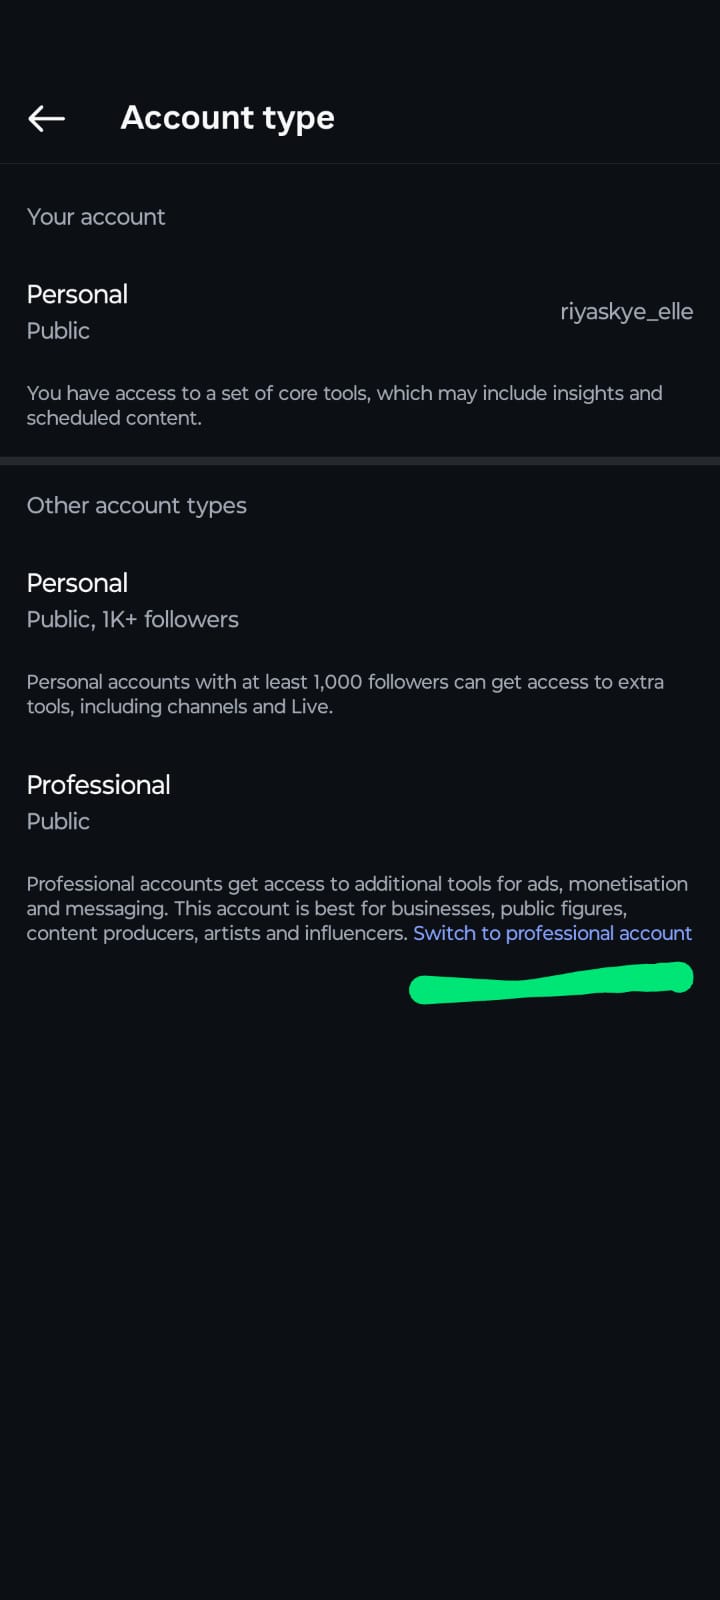
In Instagram there are three types of accounts:
- Personal Account – The default. No analytics, private or public, limited features.
- Creator Account — For influencers, public figures, artists and content creators cultivating a personal brand.
- Business Account — For brands, retailers, local businesses, services Both Creator accounts and Business accounts are "professional accounts."
For most businesses, the Business Account is the way to go. It provides you access to Instagram Shopping, contact buttons, ads management, and third-party scheduling tools.
Quick rule of thumb: If you’re selling a product or service, pick Business. If you are the product (your brand, your content) then choose Creator.
How to Set Up a Professional Instagram Account: Step-by-Step
This process all takes less than 10 minutes. Here’s how to do it exactly.
Step 1 - Download and Sign Up for Instagram
You can download Instagram for free on iOS (App Store) and Android (Google Play Store). You can also look at it on a browser at instagram.com, but some features are only available in the app.
When you sign up, you get to:
- Sign in with your email address or mobile number
- Sign up with your Facebook account (faster if you already have a Facebook Business Page)
Pro-tip: Use your business email address, not a personal one. This keeps everything clean and professional from day one.Step 2 - Choose a Good Username
Your username (or handle e.g. @yourbusiness) is one of the most important decisions you’ll make. You see it everywhere - in search, in tags, in reels.
Some rules:
- Short, memorable, and consistent with your brand name
- Avoid underlines and numbers if you can – they are hard to type and look messy
- Check the availability of the same handle on Facebook, TikTok, and X (Twitter) for brand consistency
- If your name is already taken, try adding the city or your niche. @bakerybypriya or @coimbatoresalonstudio
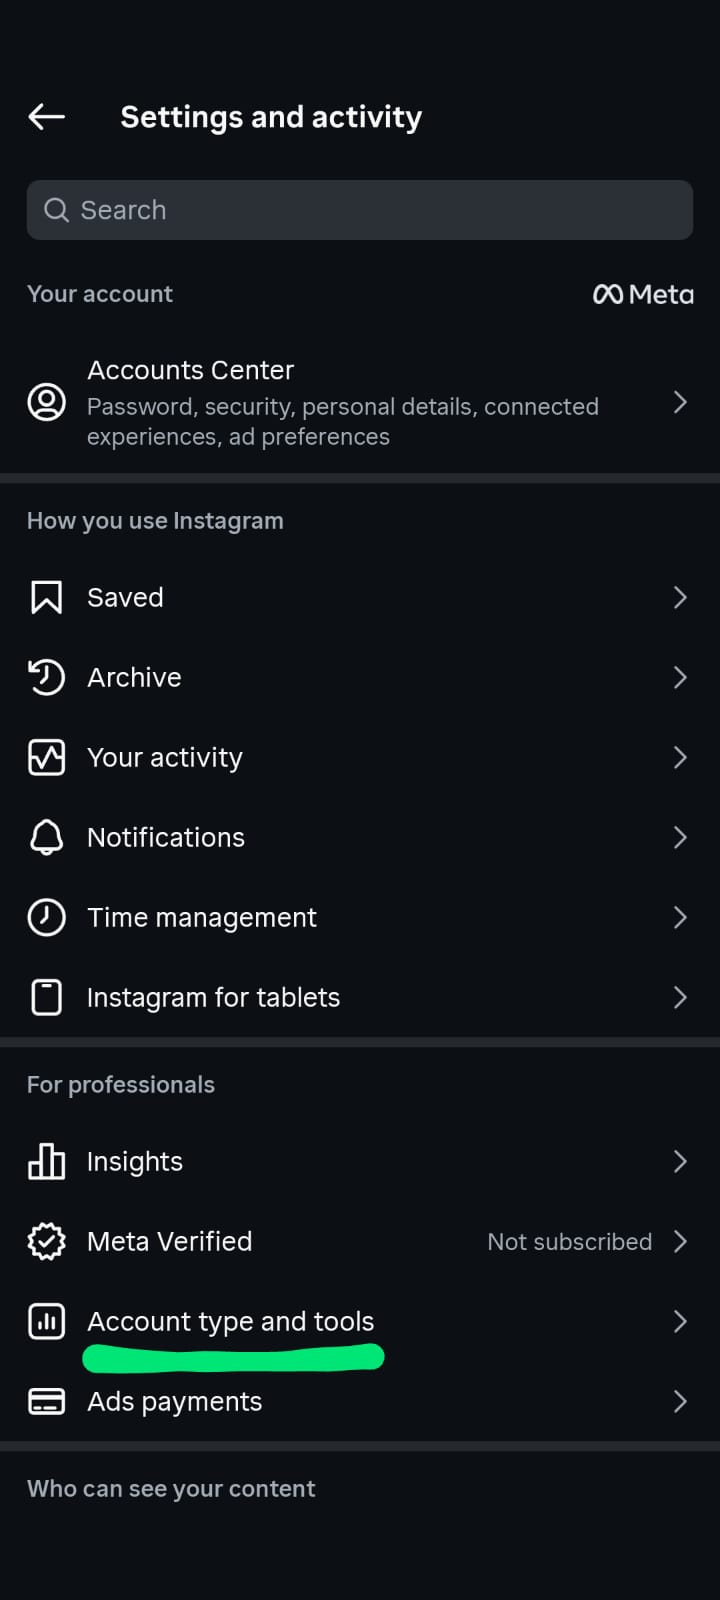
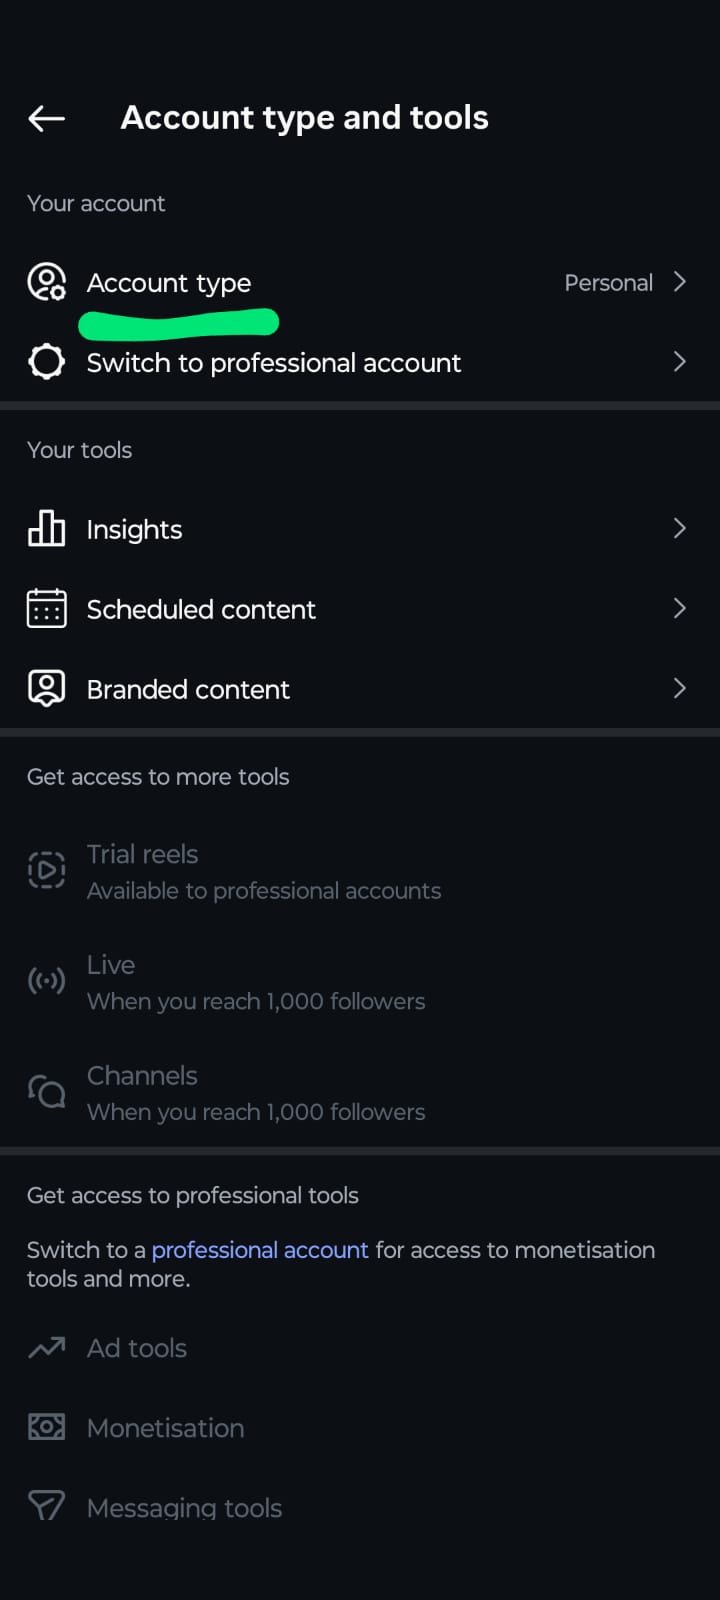
Step 3 - Change to a Professional Account
New accounts default to personal accounts. Here’s how to switch:
- Visit your Profile tab (bottom right)
- Tap the menu icon (three lines, top right)
- Go to Settings & Privacy
- Scroll to Account type & tools
- Tap Switch to Business Account
- Prefer a visual walkthrough? You can follow this step-by-step video tutorial on how to set up an Instagram business account to watch the process live on mobile, or read the full breakdown below.
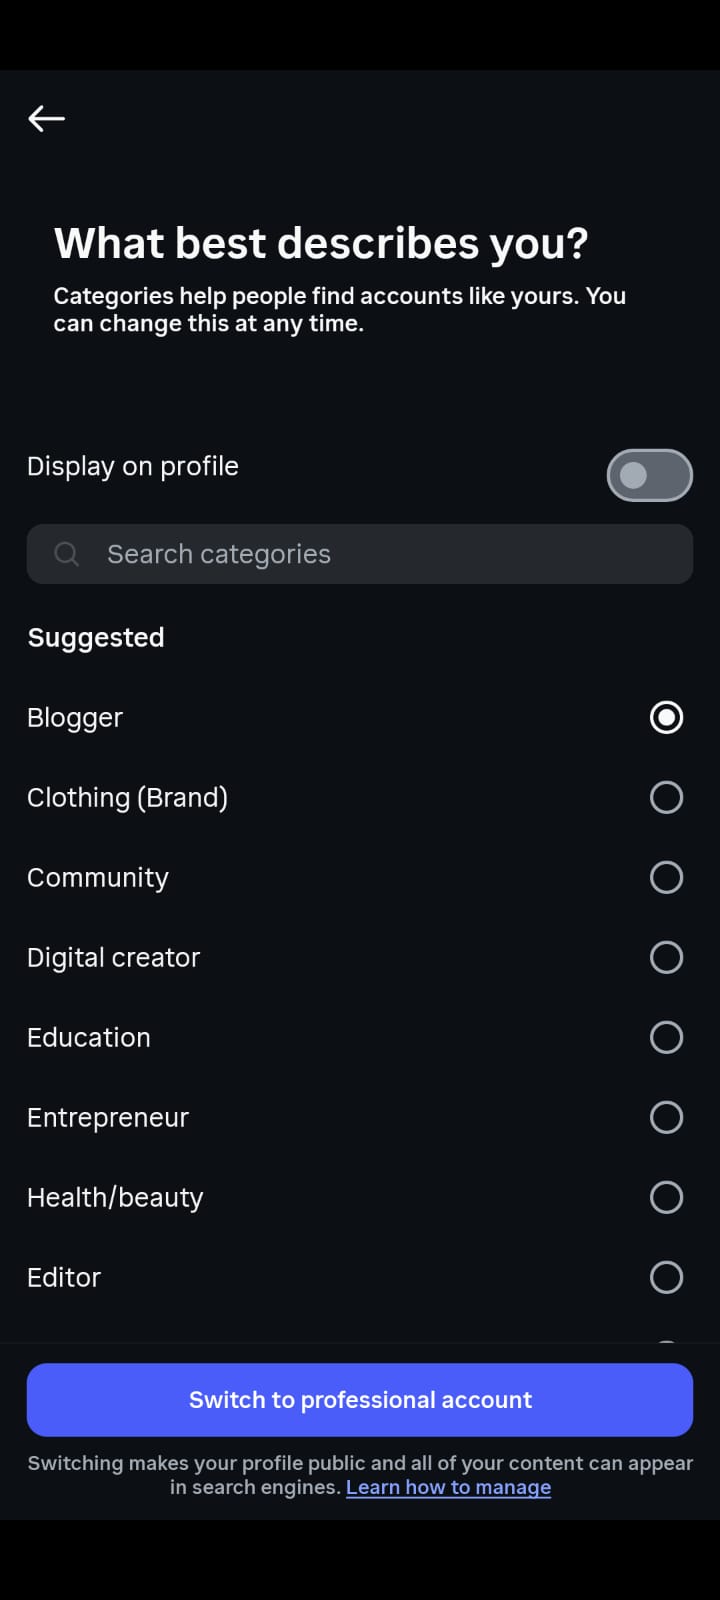
 Step 4 – Choose Your Business Type
Instagram will prompt you to choose a category for your business. Categories include “Clothing Store,” “Restaurant,” “Digital Creator,” “Photographer,” “Health & Beauty,” and many others.
This is important as:
- Appears under your name on your profile (can be hidden for a cleaner look)
- Assists Instagram’s algorithm in finding the right audience for you
- It decides the features and ad formats you can use Don’t overthink it, pick the one that’s closest to what you’re doing. This can be changed anytime in your settings.
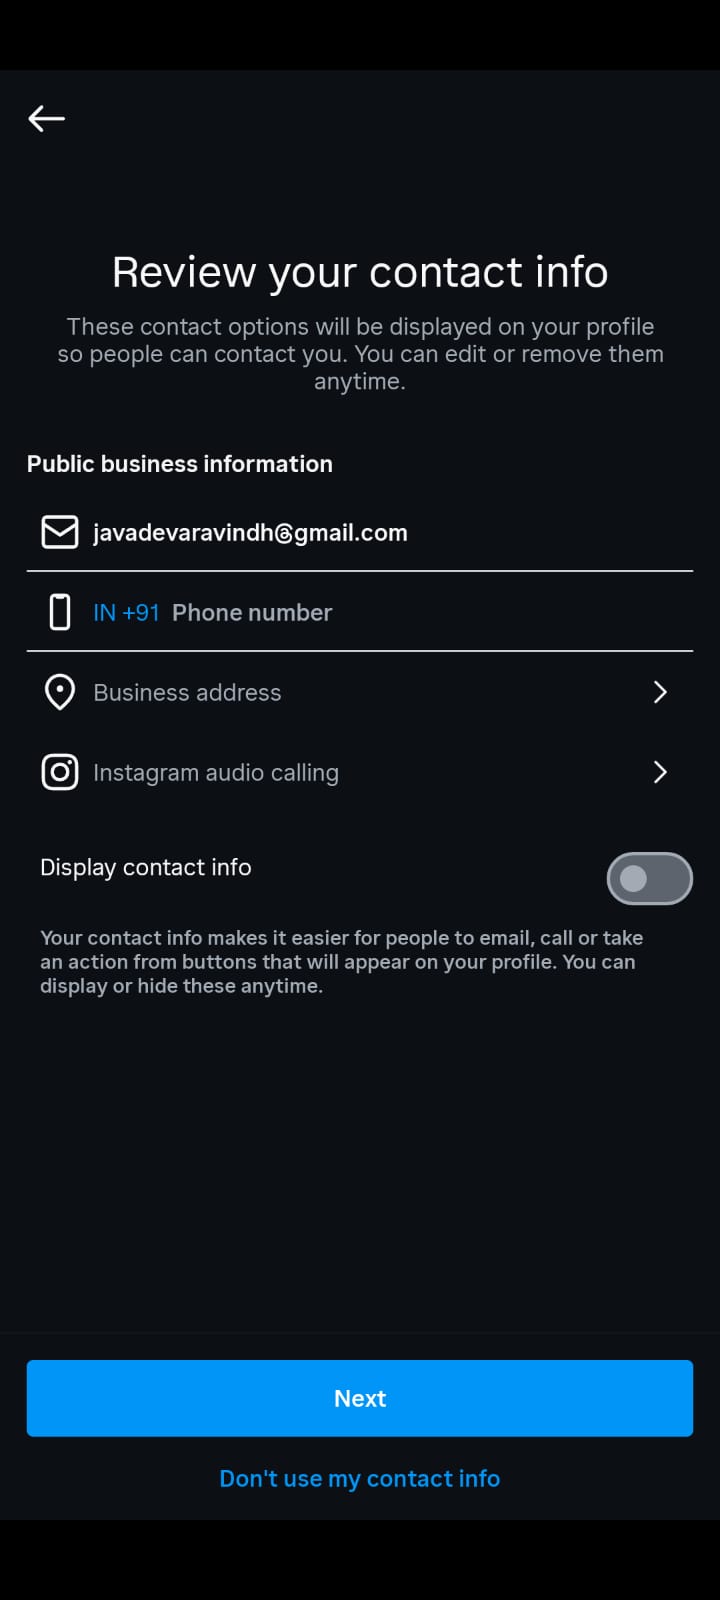
 Step 5 – Enter Your Contact Details
That's where most starters fall down. Don't be like them. Your contact info is how potential customers reach out to you, and Instagram places it as a prominent “Contact” button on your profile.
Add:
- Email (business email preferred)
- Phone number (especially for services businesses – customers love to call)
- Physical address (if you have a store or studio – it also adds credibility)
- Website URL (your most precious real estate on Instagram)
- Whatsapp Business number (if you use it – this is huge for faster customer conversations)
The contact information profile shows you are a real business that can be reached. That builds trust right away.
 Step 6 - Connect your Facebook page
Meta owns both Instagram and Facebook, and linking the two unlocks powerful cross-platform features:
- Run ads on both platforms in one place (Meta Ads Manager)
- Schedule posts with Meta Business Suite
- Get Instagram Shopping set up (requires a Facebook Shop)
- Share content to both platforms at the same time
To link:
- Settings → Linked Accounts → Facebook
- Log in to the Facebook account that is linked to your Business Page
- Choose the Page you want to connect
Note: You can link one Instagram Business account to only one Facebook Page. 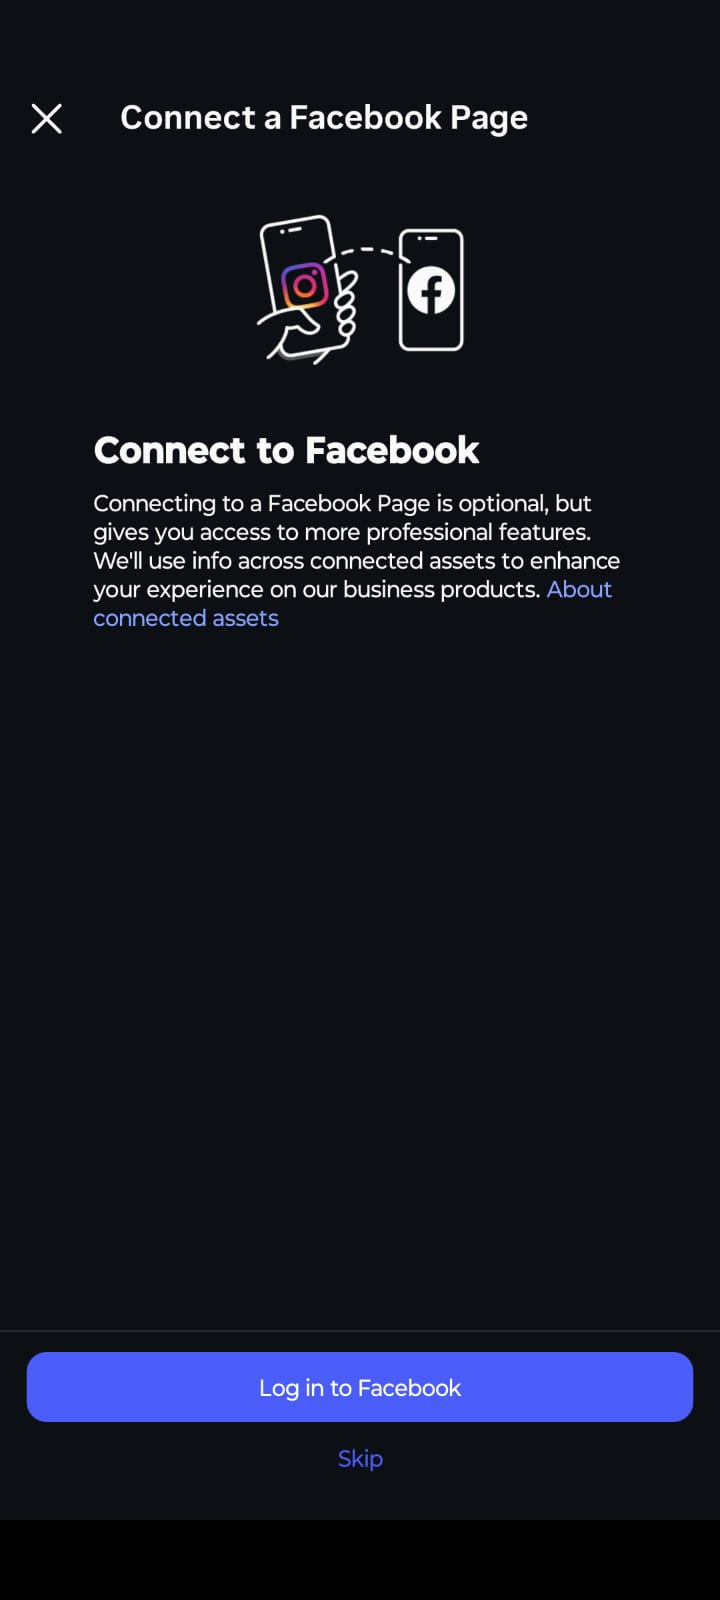 Step 7 - Finish Your Profile (Don't Skip This)
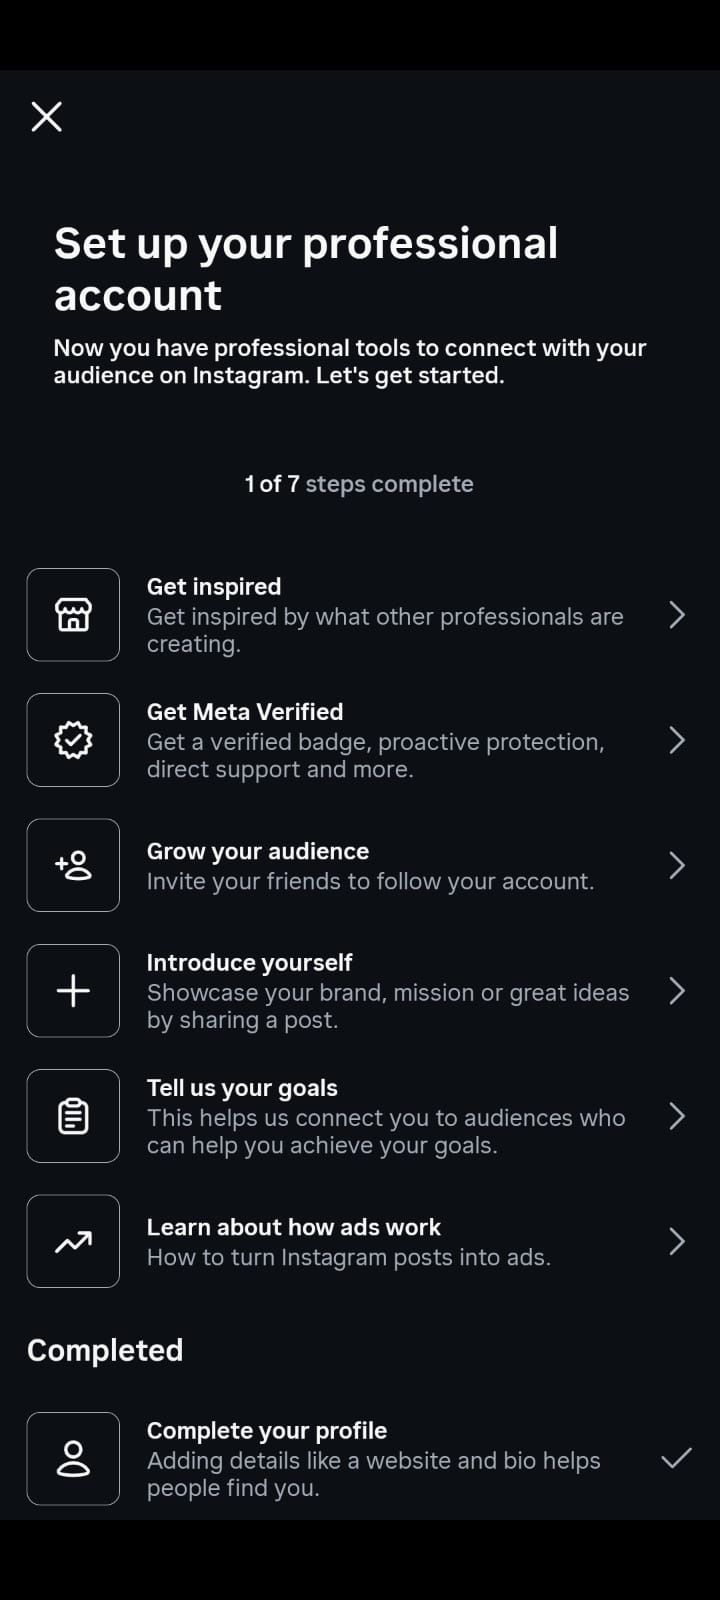
Your work account is active — but don’t stop there. Half-finished profile repels visitors. Do these before you post anything:
- Profile Picture: Use your logo (if you’re a brand) or a clean, well-lit headshot (if you’re a personal brand). Should be recognisable even on 30x30 pixels. No busy backgrounds or text heavy images.
- Bio (150 characters): This is your elevator speech. Let visitors know:
- Who you serve What you do
- What makes you special? I don’t know what you mean.
- A call to action (eg “DM for bookings” or “Shop link below 👇”)
Great bio example: Handmade silver jewellery 💍 Designed in Chennai, shipped across India DM to order | New drops every Friday
- Website Link: Instagram only permits one clickable link in your profile. If you want to point people to a few different places, use tools like Linktree, Later’s link-in-bio, or just a simple landing page.
- Story Highlights: Create Highlights from your Stories to serve as a permanent menu on your profile — like: Products, Reviews, FAQs, Behind the Scenes, Offers.
 The Master Comparison Table
| Reels Audio Pool | Full Music Library (All viral/trending tracks) | Full Music Library (All viral/trending tracks) | Commercial Library Only (Restricted, copyright-cleared tracks) |
| Analytics & Insights | None | Advanced
(Includes daily follow/unfollow tracking) | Advanced (Focuses on website clicks & shopping data) |
Benefits of a Professional Instagram Account
Once you're set up, here’s what you can actually do that personal accounts can’t
Instagram Insights (Analytics)
And your Professional Dashboard will show you detailed data on:
- Reach & Impressions — The number of unique accounts that viewed your posts vs. total views
- Content Interactions — Likes, saves, comments, shares per post
- Audience Demographics — Age, gender, location, and the hours your followers are the most active
- Profile Activity — Visits, taps on external links, taps on contact button
Use Insights to answer one question each week: What content did my audience engage with the most and why? Then do more of that.
Instagram Ads Running
With a Business account, you can promote posts directly ("Boost Post") or use Meta Ads Manager for complete campaign control. You can target by:
- Sex, age, place of residence
- Interests and actions
- Lookalike Audiences: People similar to your current followers
- Website visitors (Retargeting – Requires Meta Pixel)
If you have tight targeting and strong content, even ₹500-1000/day in ads can drive meaningful results.
Shopping on Instagram
Instagram Shopping is a game changer if you sell physical products. You can tag products right in your posts and Reels, allowing users to tap a product and purchase without ever leaving Instagram.
Instagram Shopping: How to Get Started
- Link your Instagram account to a Facebook Page with a live Shop
- Add your product catalogue to Facebook Commerce Manager
- Submit your account for Shopping review
- After getting approved, begin tagging products in your posts
You can tag up to 5 products in a post and 20 products in a carousel.
For more details on adding shopping tags to posts read this add tags to post article.
Scheduling Posts
As a Business account, you can schedule posts in advance, using:
- Meta Business Suite (official, free)
- Third-party tools like InstantDM take scheduling a step further — unlike basic schedulers, InstantDM lets you schedule your post and attach a comment-to-DM automation at the same time, so the moment your content goes live, the auto-reply is already running. Someone comments "LINK" on your Reel at 2am? They get the link in their DM instantly — no manual effort from you.
Content scheduling lets you batch-produce content once a week and stay consistent without being glued to your phone every single day.
In addition to the core features, a professional account also gives you access to Instagram’s Creator Marketplace, a space where brands are actively looking for business profiles and creators to partner with. This is where small accounts with a super engaged niche audience get discovered and it’s a real opportunity to make money through brand partnerships without cold-pitching anyone.
Another underrated benefit is third party tool integration. Professional accounts can integrate with Canva, Later, Buffer and Hootsuite in ways that personal accounts simply cannot. This means you are able to create, plan and schedule content from your laptop. No more manually posting from your phone at specific times everyday.
Then there's the question of credibility. A business account sends the right message to a potential customer who lands on your profile. The visible category label (“Clothing Store,” “Photographer,” “Consultant”), the contact button, and the clean professional layout all convey that this is a real business worth trusting — before they’ve read a single post!
Finally, as your audience grows, Professional accounts can use Instagram’s monetisation tools like subscriptions, badges in Live videos and bonus programmes to create more income streams inside the platform.
Deep Dive: How to Decode Your Instagram Insights
Setting up a professional profile is pointless if you never check the scoreboard. Your Professional Dashboard holds a wealth of data; here is how to navigate it to make informed strategic pivots.
3 Metrics That Actually Impact Growth
When reviewing your weekly metrics, avoid getting distracted by superficial "likes." Instead, look closely at these three performance indicators:
- Saves to Reach Ratio: The algorithm heavily favors saves. It signals to Instagram that your content is highly valuable. Aim for a save rate greater than 2% of your overall post reach.
- Follower Demographics and Activity Peaks: Check the "Audience" tab to discover exactly where your followers live, their age groups, and the precise hour they scroll. Do not guess when to post—let your peak activity charts determine your publishing schedule.
- Non-Follower Reach Percentage: Open an individual Reel's insights and scroll down to the reach breakdown. If less than 50% of the audience reached is from non-followers, your hook isn't capturing the Explore page. This is your sign to sharpen the first 2 seconds of your next video.
Mastering 2026 Engagement: Broadcast Channels & Meta Verified
Staying relevant on Instagram requires adopting its newest features ahead of your competitors. These two critical tools are transforming how professional profiles build credibility and scale conversions.
1. Instagram Broadcast Channels (One-to-Many Direct Funnels)
Think of a Broadcast Channel as a private, interactive Telegram channel or WhatsApp broadcast right inside Instagram. It allows you to send text updates, voice notes, exclusive behind-the-scenes content, and interactive polls directly to your most dedicated followers' DM inboxes.
Your Broadcast Channel is your Conversion Play - the place where you nurture your warmest leads. Your regular feed content is what works to attract new followers. Provide members with special discounts, solicit feedback via polls, give early access to product launches to members.
Meta Verified for Business
The blue mark is no longer reserved for legacy celebrities or massive brands. Meta Verified is a subscription package for small businesses that includes a verified badge and key protection features on a monthly basis.
Active Impersonation Protection. Meta actively tracks and removes copycats trying to scam your clients in your business name.
Direct Account Support:
Bypass the usual automated troubleshooting steps and get to live chat support with a real person to swiftly resolve account and technical issues.
Boosted Search Visibility:
Verified business profiles often get special visibility perks in search results, making it a lot easier for local customers to find you.
The Threads Benefit: Cross-Platform Synchronisation
Meta’s text-based platform Threads is tightly integrated with the Instagram infrastructure, offering a huge organic reach shortcut for today’s professional profiles.
One-Click Audience Portability:
When your Instagram followers create a Threads profile, they’re automatically prompted to follow your corresponding Threads account. This makes it super simple to build a secondary text based audience without having to start from scratch.
Cross-Platform Algorithm Enhancement:
Meta frequently showcases top Threads posts directly in the main Instagram feed. One fun text update on Threads can send fresh, high-intent traffic back to your Instagram profile without you having to film a single video.
Consistent Brand Voice:
Use Instagram to showcase your product aesthetics and behind-the-scenes Reels, then use Threads to share unfiltered thought leadership, quick industry tips and conversational QA sessions that humanise your brand.
How to Optimise Your Profile for Growth
Getting set up is only the beginning. Here’s how to set up your account for real growth.
Understanding who uses Instagram is the first step to using it effectively. According to Statista, the largest share of Instagram users are aged 18–34 — making it one of the most powerful platforms for reaching young, purchase-ready consumers across almost every niche.
Understand Your Audience Before Posting
Who is it you're talking to? Create a simple profile of your ideal customer:
- Gender and age range
- Where they live (city, state, country)
- What problems they have you solve
- Who else they follow
- What time of day they’re usually on Instagram
Eventually your Instagram Insights will provide you data on this. Until then, be smart about it, and learn from your actual customers.
Create a Visual Identity
Instagram is, above all else, a visual platform. Your grid (the feed of posts on your profile) is often the first thing a new visitor judges you by. Choose:
- 2-3 brand colours that are consistently in your posts
- Consistent editing style (same filter or preset for photos)
- Font style for text in graphics
- Content types – product photos, behind the scenes, quotes, videos, Reels
Consistency creates instant recognition in a stream of content.
Nail Hashtags (But Don’t Go Overboard)
Hashtags help Instagram categorise your content and show it to people who don’t follow you yet. 2026 Best Practices:
- Use 5-15 relevant hashtags per post (Instagram itself recommends this number)
- Mix sizes: a few big ones (1M+ posts), many medium ones (50K-500K posts) and some niche ones (under 50K posts)
- Stay away from banned or spammy hashtags – they can kill your reach
- Don’t use the same hashtags on every post – vary them depending on content
Example hashtag mix for a bakery in Coimbatore: #coimbatorebakery #homebakery #custombakes #bakersofinstagram #cakestagram #coimbatorefood #homemadecake
Instagram Reels Strategy
Instagram Reels are short-form videos up to 90 seconds long that get shown not just to your existing followers, but to a much wider audience through the Explore page and the dedicated Reels tab — making them your single most powerful tool for organic reach as a new or growing business account.
The Instagram algorithm heavily favours Reels over static images for reach. Explore page and Reels tab are how nonfollowers see Reels, so they’re your best bet for organic growth. You don't need a studio or expensive equipment.
What you'll need:
- Good lighting (a window or ring light)
- Solid framing, clean
- Hook within the first 1-2 seconds
- Captions/subtitles (most people watch without audio)
Start with 2-3 Reels per week minimum.
Engage - Not Just Post
Posting without commenting is like opening a shop without staff. Instagram rewards accounts that are active on the platform.
15 Minutes of Daily Habits:
- Respond to all comments on your posts
- Respond to DMs quickly
- Leave genuine comments on posts in your niche (not just "great post!" -- add something real)
- Encourage Engagement with Story Polls, Questions, and Quizzes
The more you interact the more Instagram will show your content to other people.
Of course, manually replying to every comment and DM is impossible once your account starts growing. This is where a tool like InstantDM becomes genuinely useful. It's an Instagram DM automation tool that automatically sends a DM the moment someone comments a keyword on your post — so if you post a Reel and ask people to comment "LINK," InstantDM instantly delivers the link to their inbox without you lifting a finger.
Common Mistakes To Avoid
- Your bio was empty or vague. “Welcome to our page” tells nothing to visitors. Make each 150-character bio count.
- Posting irregularly. Posting three times in a week then going radio silent for three weeks confuses the algorithm and loses followers. Regular posting schedule (even 3x/week) is better than sporadic posting.
- Analytics? What analytics? Instagram lets you know exactly what is working. At least weekly, review your Insights and make adjustments.
- Purchasing followers. Fake followers don’t purchase from you. Even worse, they ruin your engagement rate and make your account look untrustworthy to real potential customers.
- Only stills. If you’re not doing Reels by 2026, you are missing out on huge reach.
- Forgetting the link in the bio. Every bit of content you create should have a purpose – and that purpose is often directing someone to your website, product page or booking form. Update your link.
Disadvantages:
Professional profiles are essential tools, but it is only fair to mention that they come with minor functional tradeoffs. "If you know them in advance, there are no surprises.
The Commercial Audio Trap:
Corporate copyright laws are very restrictive. Business accounts. If you switch your profile to a Business one, you will not be able to use popular trending songs anymore and you will only have access to the Commercial Music Library. If your content strategy is heavily based on viral lip-syncing or popular music trends, you may want to opt for a Creator account instead.
Permanent Data Loss Risk:
You can always switch back to a Personal account at any time, but if you do, you will immediately and permanently lose all of your historical analytics dashboard, active ads and post insights.
Loss of Full Privacy:
You can’t make professional accounts private. Anyone on the internet can see your grid, your list of followers and your public tags.
Summary: Your Plan of Action
So here’s your checklist to get started today:
- [ ] Download Instagram and set up an account with your business email
- [ ] Switch to Professional (Business) Account in Settings
- [ ] Select your business category
- [ ] Include all contact info (email, phone, website)
- [ ] Link your Facebook Business Page Create a punchy, clear bio with a call to action
- [ ] Upload your logo or business profile picture
- [ ] Add your website link (or a Linktree if you have more than one link)
- [ ] Make at least 3 Story Highlights (Products, Reviews, FAQs)
- [ ] Schedule your first week of content before going live
Conclusion:
Building a professional Instagram account in 2026 is one of the most accessible, high-impact marketing moves your business can make. Within ten minutes, you can transition from a basic profile to a powerful, feature-rich commercial hub equipped with built-in analytics, advertising capabilities, and automated scheduling tools. However, setting up your profile is only the baseline. Long-term commercial growth relies entirely on your strategy, structural consistency, and active engagement. By committing to regular Reels, optimizing your bio, and leveraging data-driven insights, you can efficiently transform your Instagram presence from a simple visual feed into a highly profitable revenue-generating asset.